Join Tool
Use Join to combine 2 inputs based on common columns between the 2 tables. You can also join 2 data streams based on row position.
Tip
This tool has a One Tool Example. Visit Access Sample Workflows to learn how to access this and many other examples directly in Designer Cloud.
Configure the Tool
Select how to perform the Join:
Join by Specific Columns: Select this option when the two tables have one or more columns in common (like an ID) and the data will be joined together. You can choose to Join based on multiple columns. Each Join should be a separate row in the grid.
Join by Record Position: Select this option when the two tables to be joined have the same column structure, and the data will be joined by its position within the two tables.
Potential Error Message
The Join tool restricts what column types can be joined together. The error messages might state "Joins on Float are not recommended due to a rounding error that might occur."
String columns can only be joined to other string columns.
Numeric columns can only be joined to other numeric columns.
Boolean columns can only be joined to other boolean columns.
DateTime column types can only be joined to their exact type.
Each Input, Left Columns and Right Columns, has a dropdown list where you can select columns. Select the join column for each input. Designer Cloud automatically selects a join column from an input if the same column header has already been selected from a different input. If you need multiple join columns, you can configure an additional row of join columns.
Select the dropdown to choose an additional join column for each input.
To delete a join column, select the trash icon.
Use the Columns to Keep table to modify the incoming data stream. Each row in the table represents a column in the data (for more details, go to the next sections).
Select, Deselect, and Reorder Columns
To include a column in data, check the check box. Uncheck the check box to exclude the column.
To reorder the columns of data:
Select and hold the reorder icon, and drag the row up or down.
Select to highlight a row and use the up arrow or down arrow to move the rows to a new location.
Note
The Unknown column is selected by default. It allows new columns in the data. Move the column to the location where you want a new column.
Modify Data Type
To change the data type of a column, select Type, then select a new data type from the dropdown.
Rename a Column or Add a Description
To change the name of a column, select the Rename column associated with the column and enter the new name.
View More Actions
After you highlight columns of your data in the Columns to Keep table, select the More Actions menu from the 3-dot icon to view configuration options...
Select: Use the select submenu to quickly select or deselect all of the left or right columns. You can also deselect duplicate columns.
Move Columns to Top: Move highlighted columns to the top of the table.
Move Columns to Bottom: Move highlighted columns to the bottom of the table.
Add Prefix: Add a prefix to highlighted column names.
Add Suffix: Add a suffix to highlighted column names.
Clear Column Renames: Remove the new name for either all columns or only the highlighted columns.
Change Data Type: Change the data type of highlighted columns at once.
Remove Missing Columns: Remove all columns that are no longer included in the data.
Output Types
The 3 outputs that result from the join are...
L anchor | Contains rows from the L input that didn't join to rows from the R input. |
| |
J anchor | Contains rows that joined from the L input to the rows in the R input. |
| |
R anchor | Contains rows from the R input that didn't join to rows from the L input. |
|


Note
To optimize your workflow's efficiency, the Join tool restricts the sample size to show only 3 pairs for every match in the Results Grid. However, when you run your workflow or output your data, the entire dataset is used.
Additional Types of Joins
Refer to this table to use the Join tool to execute different types of joins.
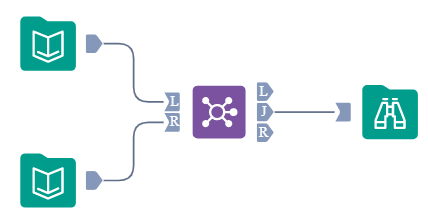
Inner Join: Contains rows that joined from the L input to rows in the R input. |
| The J output of the Join tool contains the result of an inner join. | |
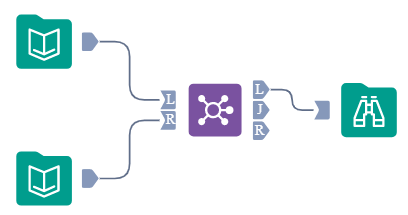
Left Unjoined: Contains rows from the L input that didn't join to rows from the R input. |
| The L output of the Join tool contains the result of a left unjoined. | |
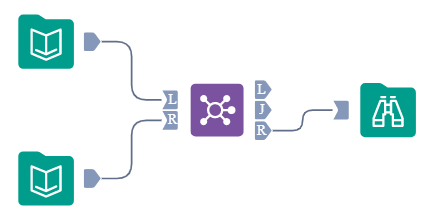
Right Unjoined: Contains rows from the R input that didn't join to rows from the L input. |
| The R output of the Join tool contains the result of a right unjoined. | |
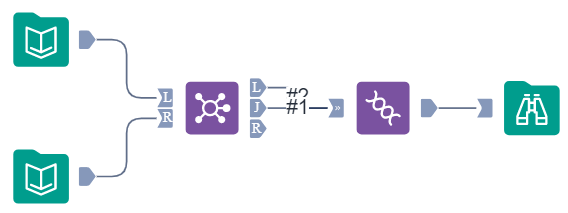
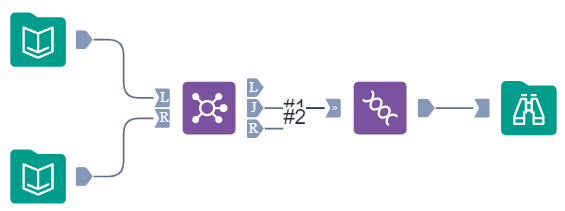
Left Outer Join: All rows from the L input, including the rows that joined with the R input. |
| To perform a left outer join, connect the J and L outputs of the Join tool to the Union tool. Connect the J output first to establish the combined table schema. | |
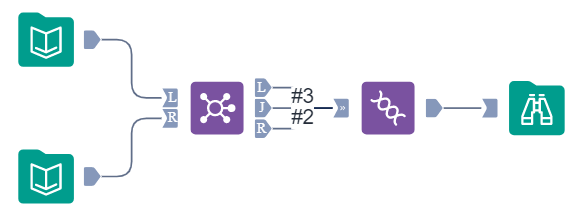
Right Outer Join: All rows from the R input including the rows that joined with the L input. |
| To perform a right outer join, connect the J and R outputs of the Join tool to the Union tool. Connect the J output first to establish the combined table schema. | |
Full Outer Join: All of the rows from both L and R inputs. |
| To perform a full outer join, connect the J, L, and R outputs of the Join tool to the Union tool. Connect the J output first to establish the combined table schema. |
Commas as Decimal Separators
Check the Use Commas as Decimal Separators (String/Numeric Conversions only) to use a comma (,) as a decimal separator.