ロールの作成
重要
2025年5月現在、新規でAlteryxをご利用の方は、Alteryxエディションを使用している可能性があります。ユーザーのロールと機能が変更されています。詳細については、概要を参照してください。
管理者は、ロールを作成してユーザーに割り当て、Alteryx Oneでユーザーが作成したオブジェクトへのアクセスを管理できます。
ロールとは、ユーザーに割り当てることができる一連の権限です。
権限は、オブジェクトの種類ごとのアクセスレベルを管理します。
既定では、ユーザーにはアクセス権が付与されていませんが、ワークスペースでプロビジョニングされると1つ以上のロールを割り当てることができます。
詳細については、権限とロールのリファレンスをご確認ください。
必要に応じて、ユーザーロールを作成して、オブジェクトタイプごとに異なるアクセスレベルを定義できます。
注記
新しいロールを作成するには、管理者である必要があります。
注記
ロールは加法的です。1つのユーザーアカウントに複数のロールが割り当てられている場合、そのユーザーは、割り当てられたロールの中で各権限について最高レベルのアクセス権が適用されます。
注記
ロールを割り当てる、割り当てを解除する、または編集すると、権限への変更が、関連付けられたユーザーアカウントに即座に適用されます。再度ログインする必要はありません。
ロールの作成
新しいロールを作成するには、次の手順を実行します。
左側のナビゲーションバーで、[ユーザーメニュー] > [管理者コンソール] > [ロール]を選択します。
[ロール]ページで、使用可能なロールの一覧を確認します。詳細については、ロールページを参照してください。
新しいロールを作成するには、[ロールの作成]を選択します。
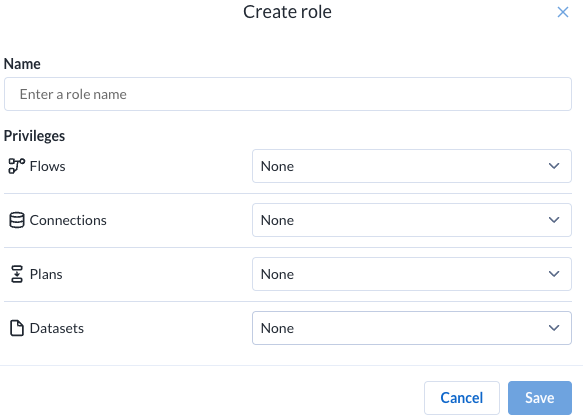
[ロールの作成]ダイアログで、次の項目を指定します。
名前: ロールの名前を入力します。この値は使用可能なロール対して一意である必要があります。
権限
使用可能なオブジェクトタイプごとに、ロールのアクセスレベルを指定します。
これらの権限に関する詳細は、権限とロールのリファレンスをご確認ください。
[保存]を選択して、ロールを作成します。
これで、ロールが使用可能になり、ユーザーに割り当てることができます。下記を参照してください。
詳細については、ロールの作成ダイアログを参照してください。
例 - 読み取り専用アクセスロール
一部のユーザーを、ロールベースのオブジェクトに対して読み取り専用アクセスに制限したいとします。
[ロール]ページで、[ロールの作成]を選択します。
[ロールの作成]ダイアログで、次のように入力します。
名前:
read-only権限: 使用可能な各権限について、[
ビューアー]を選択します。注記
一部の権限には、[
ビューアー]アクセスレベルがない場合があります。これらの権限については、[なし]を選択する必要があります。ただし、そのようなロールが割り当てられているユーザーは、これらのオブジェクトが一覧表示されているページにはアクセスできません。
[保存]を選択します。
これで、ロールが使用可能になり、ユーザーに割り当てることができます。下記を参照してください。
例 - 空のロール
状況によっては、空のロールをユーザーに割り当てたい場合があります。たとえば、一部の管理者に対して、ユーザーが作成したオブジェクトへのアクセス権を付与せずに、その管理者がプラットフォームの一部のみを設定できるように制限することができます。
[ロール]ページで、[ロールの作成]を選択します。
[ロールの作成]ダイアログで、次のように入力します。
名前:
empty権限:
すべての権限について、[
なし]を選択します。
[保存]を選択します。
これで、ロールが使用可能になり、ユーザーに割り当てることができます。下記を参照してください。
ロールの割り当て
ロールを作成したら、ユーザーに割り当てることができます。
注記
ロールを割り当てると、そのロールがユーザーのアカウントに追加されます。アカウントにすでに存在するロールが置き換えられることはありません。
注記
ロールを割り当てたり割り当てを解除したりすると、その権限は割り当てられたユーザーのアカウントに直ちに付与されます。変更の確認のために再度ログインする必要はありません。
[ロール]ページで、割り当てるロールを見つけます。
画面の右側で、ロールのコンテキストメニューをクリックします。[ロールを割り当てる]を選択します。
[ロールの割り当て]ダイアログで、ロールを割り当てるユーザーのEメールアドレスのリストを入力します。
[割り当てる]を選択します。
ロールとそれに関連付けられた権限がユーザーアカウントに即座に付与されます。
ロールの変更
ロールの作成後、必要に応じて変更できます。
注記
ロールの権限が変更されると、そのロールが現在割り当てられているすべてのユーザーに変更が即座に適用されます。変更を行う前に、影響を受ける可能性のあるユーザーを確認してください。詳細は、ロールの詳細ページを参照してください。
[ロール]ページで、変更するロールを見つけます。
ページの右側にあるコンテキストメニューから、[編集]を選択します。
ロールに割り当てられている権限を確認し、必要に応じて変更を行います。
[保存]を選択します。
アカウントで現在そのロールが割り当てられているすべてのユーザーに対し、変更された権限が即座に適用されます。
ロールの割り当て解除
ユーザーアカウントからロールを削除するには、次の手順を実行します。
注記
ユーザーアカウントからロールを削除すると、そのユーザーが作成したオブジェクトへのアクセス権が削除される場合があります。ユーザーがこれらのオブジェクトの所有者である場合、オブジェクトが共有されている場合でも、一部のアクセス権が完全に削除されることがあります。
[ロール]ページで、1つ以上のユーザーアカウントから削除する対象のロールを見つけます。
そのロールを選択します。
[ロールの詳細]ページで、[ユーザー]タブを選択します。
ロールの割り当てを解除するユーザーを見つけます。そのユーザーのコンテキストメニューで、[ロールの割り当ての解除]を選択します。
これで、対象ユーザーのアカウントからロールの割り当てが解除されます。
詳細については、ロールの詳細ページを参照してください。
ロールの削除
警告
現在ユーザーに割り当てられているロールを削除することができます。ロールを削除すると、そのロールはすべてのユーザーアカウントから削除され、元に戻すことはできなくなります。ロールを削除する前に、影響を受ける一連のユーザーと、そのユーザーにアクセス権が付与されているオブジェクトを確認してください。
[ロール]ページで、削除するロールを見つけます。コンテキストメニューで[削除]を選択します。
削除を確定します。
これで、ロールが削除されます。削除したロールが割り当てられていたすべてのユーザーは、そのロールに割り当てられた権限にアクセスできなくなります。
詳細については、「ロールページ」を参照してください。