Samples Panel
For smaller datasets, the Transformer page displays the entire dataset. For larger ones, the source data is sampled for use in the Transformer page. Through the Samples panel, you can create new samples and select them for display in the Transformer page.
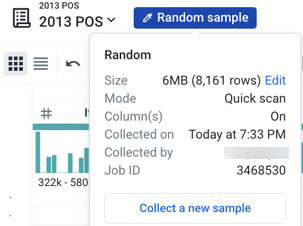
At the top of the Transformer page, the type of the current sample is displayed next to the dataset name. To open the Samples panel, click the current sample indicator:

Figure: Click the current sample button.
In the example above, you can see that the current sample is a Random sample.
Initial Data: The sample is taken from the first set of rows in the first file or table that is part of the dataset.
In some cases, the Initial Data sample is the entire dataset.
Tip
For purposes of loading the data, the initial data sample is generated and displayed at first. For a better representation of the entire dataset, you should create a new sample.
In other cases, the Initial Data sample is generated from a collection of files.
If the recipe is a child recipe, then the Initial Data sample indicates the selected sample of the parent recipe.
For more information on this special sampling type, see Overview of Sampling.
To create a new sample, click Collect a new sample.
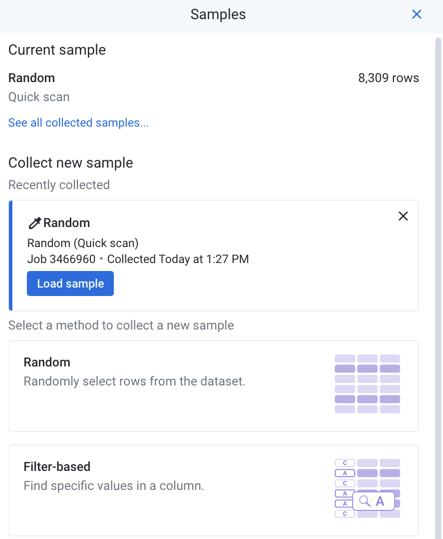
The Samples panel is displayed on the right side of the screen:
Tip
You can also open the Samples panel by clicking the Eyedropper icon at the top of the page.
To review all samples that you have created, see Sample Jobs Page.

Figure: Samples Panel
Current sample:
At the top of the panel, you can review the currently loaded sample. Each user has his own active sample on a dataset.
Note
When a new sample is generated, any Sort transformations that have been applied previously must be re-applied. Depending on the type of output, sort order may not be preserved.
Initial Data: By default, the application loads the first N rows of the dataset as the initial data sample when the Transformer page is opened. The number of rows depends on column count, data density, and other factors. If the dataset is small enough, the full dataset is used.
Note
By default, samples may be up to 10 MB in size or may be limited based on the maximum number of files that can be scanned. For datasets smaller than this limit, the entire dataset is loaded. See Overview of Sampling.
Click the link in the current sample card to see the list of all available samples.
Tip
To change the name of a sample, click its card in the list of all available. Then, click the Edit icon.
New samples:
Below the current sample, you can review the available options for creating new samples. Each type of sample reflects a different method of collection.
Warning
The data that is displayed in the data grid is based on all of the upstream samples after which all subsequent steps in each upstream recipe are performed in the browser. If you have a large number of steps or complex steps between the recipe locations for your samples in use and your current recipe location, you may experience performance slow-downs or crashes in the data grid. For more information on sampling best practices, see https://community.trifacta.com/s/article/Best-Practices-Managing-Samples-in-Complex-Flows.
To collect a new sample, click the appropriate sample card. See below.
Tip
A sample execution is a type of job. Any issues related to the execution of a sampling can be reviewed through the job logs.
To cancel a sample collection, click the X next to the progress bar. The interrupted sample is listed as unavailable. You can download the logs from the unfinished sample collection.
After a sample is created, you can load it at any time, as long as it is still valid. Next to a collected sample, click Load sample.
For more information on sampling methods, see Overview of Sampling.
Status bar:
At the bottom of the Transformer page, you can review the number of rows and columns and count of data types in the currently displayed sample.
Note
As you add transformation steps to your recipe, the values in the status bar change to reflect the current state of the loaded sample.
Note
Some operations, such as union, may change the row counts without invalidating the sample. If the operation increases the size of the dataset beyond the sample size limit enforced by the application, then a subset of those rows is displayed. This is a known issue.
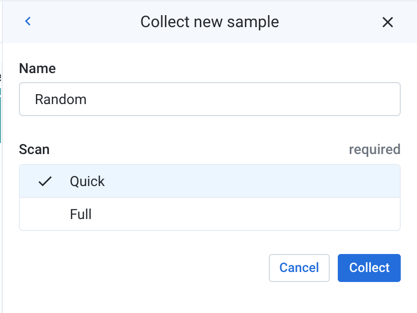
Collect new sample
When a new sample is collected, it is gathered based on the current location in the recipe when the sample is gathered. So, if the recipe contains steps that join in other datasets, those joins are performed to bring together the data from which the sample is executed.

Figure: Collect new sample panel
Note
Except for the initial data sample, all samples are generated based on the steps leading up to the location of the cursor in the recipe. If earlier steps are deleted or modified, the collected sample can be invalidated.
Note
When sampling from compressed data, the source is uncompressed, and a new sample of it is loaded into the data grid. As a result, the sample size you see in the grid corresponds to the uncompressed data.
Steps:
In the Samples panel, select the type of sample to create. For more information on sample types, see Overview of Sampling.
In the Collect new sample panel, specify the following parameters, some of which may not be required for your sampling method:
Choose a sampling method: Select or enter the type of sample. If you already selected a sampling method, this value is pre-populated for you.
Name: You can enter a new name of the sample as needed.
Tip
Naming your samples can assist in tracking them later. For example, you might choose to add a date stamp to the name to track when you captured the sample.
Scan Type: (Does not apply to all sampling methods) Types of scans:
Quick- performs a random scan of the dataset to extract the appropriate number of rows for the sample.Full- gathers the sample from the entire dataset. Depending on the size of the dataset, this method can take a while.
Column or columns: (Stratified, Cluster-based) Name of the column from which to gather values to evaluate (Anomaly-based) Specify the name or names of one or more columns containing the anomalies to include in your sample. Multiple columns can be specified by comma-separated values. A column range can be specified using the tilde (
~) character.
Condition: (Filter-based, Stratified, Cluster-based, Anomaly-based) Filter the sample based on a specified condition. For example:
invoiceDate > 90
Anomaly type:(Anomaly-based) Select the type of anomalous values to include in your sample: invalid, missing, or both types.
Variable overrides: If one or more variables is associated with your dataset, you can define the value overrides to be applied when the sample is executed.
You can use these overrides to sample data from different source files in your dataset with parameters.
A variable can have an empty value.
For more information, see Overview of Parameterization.
To begin collecting the sample, click Collect.
You can continue working while the sample is collected. When the sample is available, a status message is displayed in the Transformer page.
You can click Load Sample in the Samples panel to begin using it.
Collected samples
In the Collected samples panel, you can review the available and unavailable samples. If applicable, you can review the variable override values that were applied during the sampling.
To use one of the available samples, click Load. The sample is loaded in the data grid. For more information, see Generate a Sample.
Note
If you add recipe steps that change the number of rows in your dataset (or a few other edge case steps), some of your existing samples may no longer be valid. When you execute a join, union, or delete action or edit steps before this action, you may be prompted with the Change Recipe dialog, which includes the following message:
For more information on the types of transformations that can invalidate samples, see Reshaping Steps.
Cancel sample jobs
You can cancel a sample job that is currently being executed.
In the Samples panel, locate the job in-progress. Click the X.
You can also review and cancel sample jobs through a page in the Cloud Portal. For more information, see Sample Jobs Page.