 Machine Learning Send
 Machine Learning Send
User Role Requirements
User Role* | Tool/Feature Access |
|---|---|
Full User | ✓ |
Basic User | X |
*Applies to Alteryx One Professional and Enterprise Edition customers on Designer versions 2025.1+.
Use the Machine Learning Send tool to create or update existing projects in Alteryx Machine Learning.
Important
The Machine Learning Send tool requires the AMP engine to run. Note that AMP is the default engine for all new workflows starting with Designer 22.1. Learn more about the AMP engine.
Install the Tool
Important
If you’ve previously installed the Machine Learning Integration tools, you should first update to the 2023.2.0 version before you install the 2024.1 version. Even if you’ve already installed Designer 2024.1. Note that you don’t need to uninstall previous versions before installing a new version.
To install the Machine Learning Send tool in Designer...
Go to the downloads page.
Go to Alteryx Intelligence Suite > Alteryx Intelligence Suite (your Designer version).
Note that you must have Designer 24.1 or higher installed.
Download the Alteryx Machine Learning Designer Integration Tools YXI file.
Open Designer with the "Run as Administrator" option enabled.
Open the YXI file to start the installation process.
Note that the Machine Learning Send tool appears in the Machine Learning tool palette.
Important
The integration tools are separate from the tools included in Alteryx Intelligence Suite.
Configure the Tool
Tool Version Selection
If you have multiple versions of the Machine Learning Integration tools installed, you can select which version you want to use in your workflow.
Add a Machine Learning Integration tool to your workflow.
Right-click the tool and then select the tool version you want to use from the Choose Tool Version menu.
If you don’t make a selection, the tool defaults to the most recent version.
Connect to Alteryx Machine Learning (OAuth)
For first time setup of the Machine Learning Integration tools, you must add your Alteryx One Platform workspace as a Data Source…
Add a Machine Learning Integration tool to your workflow.
From the tool Configuration window, select Set Up a Connection to open the Data Connection Manager (DCM).
On the Data Sources page, select New.
Enter a Data Source Name that describes your Alteryx One workspace.
Enter the Base URL of your Alteryx One workspace. For example,
https://us1.alteryxcloud.com/.Enter your Alteryx One Workspace Name.
Select Save.
From the Connections section, select Connect Credential.
Leave
OIDCas the Authentication Method.From the Credential dropdown, select your authorization credential.
If you don’t have an authorization credential, select Create New Credential.
Enter a Credential Name. For example, the name of your Alteryx One workspace.
Select the Allow connection for SDK checkbox.
Select Link if the Credential had been created previously, or select Create and Link if you just created it.
Select Connect. Designer directs you to sign in to your Alteryx One workspace.
If you already have a Data Source configured…
Add a Machine Learning Integration tool to your workflow.
From the tool Configuration window, select Set Up a Connection to open the Data Connection Manager (DCM).
On the Data Sources page, select the Data Source you set up previously.
Select Connect. Designer directs you to sign in to your Alteryx One workspace.
Project Creation
To create a new project, select Create New Project:
Enter a Name and Description for the new project.
Select Run to upload the new project to Alteryx Machine Learning.
To upload data to an existing project, select Upload to Existing
Check the project you want to upload data to from the list. You can search for a specific project using the search bar or the filter options from the menu.
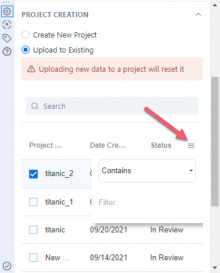
Select Run to upload the data to the existing project in Alteryx Machine Learning.
Warning
Uploading new data to an existing project resets it and overwrites the data that already exists for that project.