How to Use Postman
You can use Postman to test Server API V3.
Prerequisites
You must have Postman installed. Postman is available at https://www.postman.com/downloads/. Install and create an account. Be sure to use the desktop version of Postman, not a browser version. After confirming your email address, you might end up in the browser version.
Note
The web version of Postman can’t access most customers' APIs because their APIs are behind the firewall. Therefore, the web version of Postman can't get there.
You must have an API Key and an API Secret in order to test Server API in Postman. Go to the User Roles and Permissions help page for more information.
Add API to Postman
To test Server API, import it to Postman.
Get Your Documentation and Token URLs
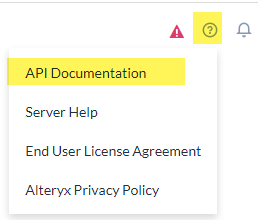
To get your Documentation URL, go to the Server UI, select the question mark icon in the upper right corner and then select API Documentation. This will take you to the API V3 Swagger page.
Get your Documentation URL. Note the double backslash after "webapi".
Note
Localhost will only work if Server is running on the same host as Postman. Otherwise (if it is a remote workstation), you must use the hostname or IP address instead.
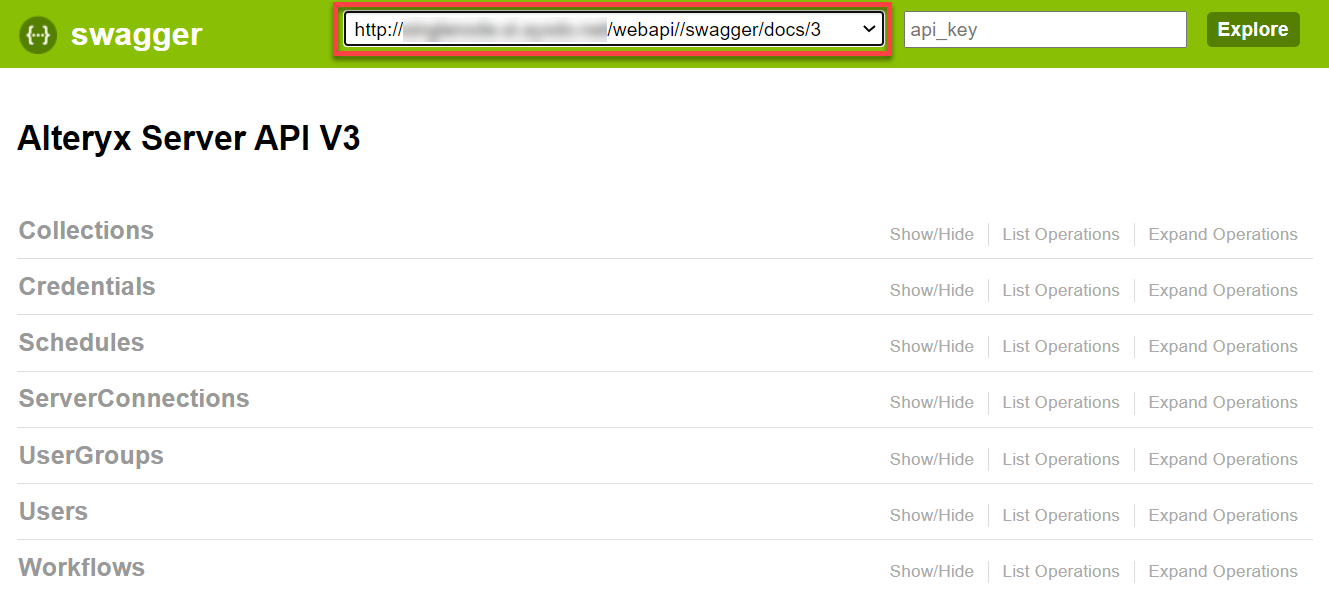
Example: http://localhost/webapi//swagger/docs/3.
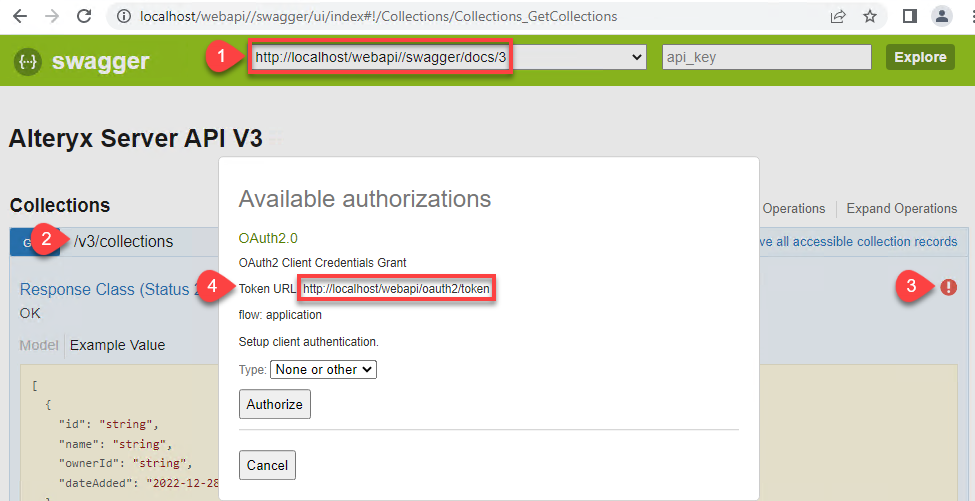
View any API endpoint.
Select the red exclamation point to the right to start the authentication process.
Copy the Token URL. Example: http://localhost/webapi/oauth2/token.
Load the Swagger Documentation in Postman
In Postman go to Collections tab.
Select Import.
Enter the Documentation URL found as described in Get Your Documentation and Token URLs.
Select Import.
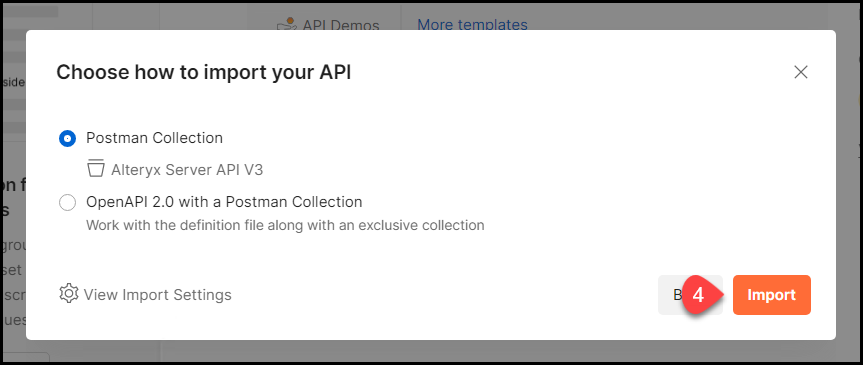
This adds the Alteryx Server API V3 under the Collections tab at the left.
Create OAuth2 Access Token To Use in API Calls
To be able to send your requests, you must set up your authorization and create an OAuth2 access token in Postman.
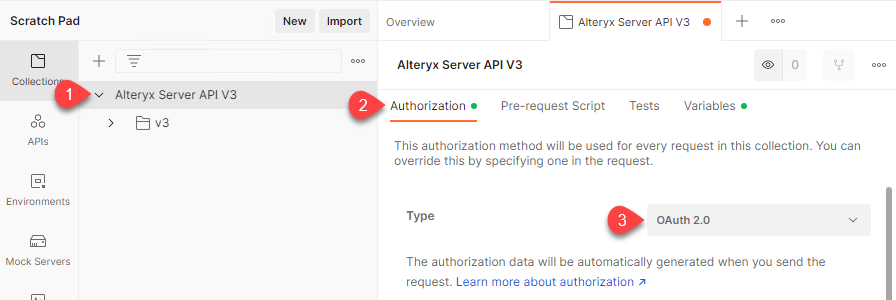
Go to Collections and select Alteryx Server API V3.
Select the Authorization tab.
Select OAuth 2.0 as Type.
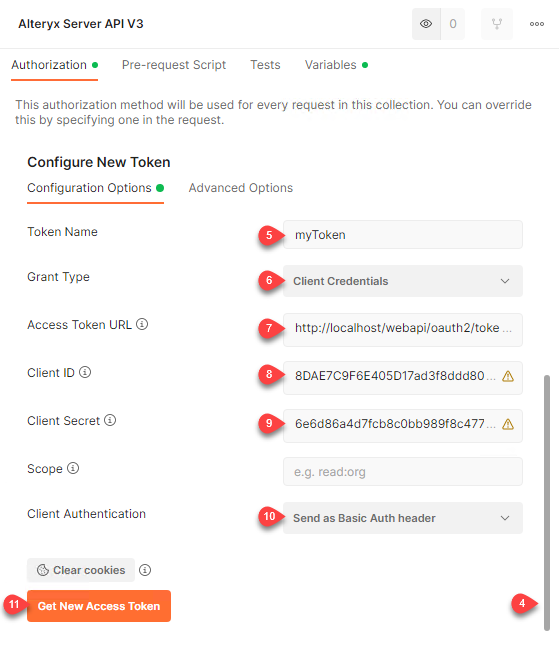
Scroll down the Authorization page to the Configure New Token section.
Set Token Name to YOUR_TOKEN_NAME.
Note
We are not providing an input for YOUR_TOKEN_NAME. You can enter any Token Name you want.
Select Grant Type to Client Credentials.
Set Access Token URL to TOKEN_URL_FOUND_ABOVE.
Set Client ID to YOUR_API_ACCESS_KEY.
Set Client Secret to YOUR_API_ACCESS_SECRET.
Set Client Authentication to Send as Basic Auth header.
Select the Get New Access Token button.
Select Proceed.
Select the Use Token button.
Recreate Your Access Token if It Expires
After some time your original token expires and you get a 401-Failure to Authenticate error when accessing the API. To recreate the token:
Select Alteryx Server API V3 on the Collections tab.
Select Manage Tokens from the Available Tokens dropdown menu.
Select the expired token (there will be a line through it).
Delete the expired token.
Create a new token as described in Create OAuth2 Access Token To Use in API Calls.
Use API in Postman
The example below demonstrates a common API pattern to
In the following example, we’ll use the API to retrieve the User ID from the list of users in Server. Then, we'll use that User ID to get the user's detailed information. In the last step, we’ll update the user record using the user's data.
For simplicity, we will change the first name of the user in this example. In practice, it would be best to do this using the Server UI.
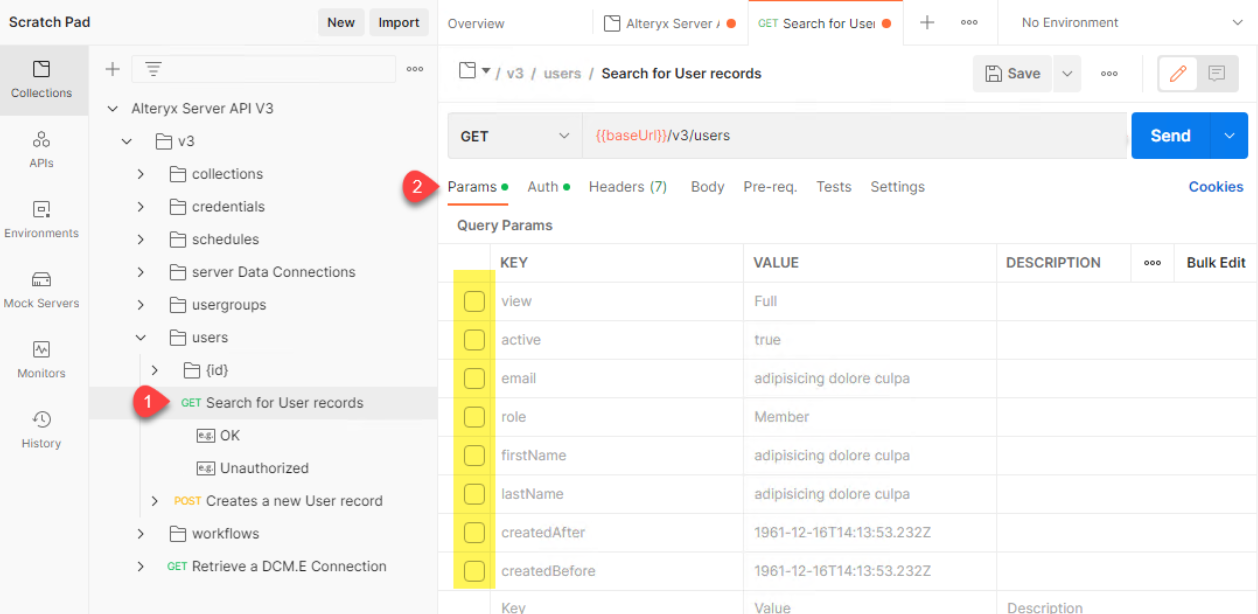
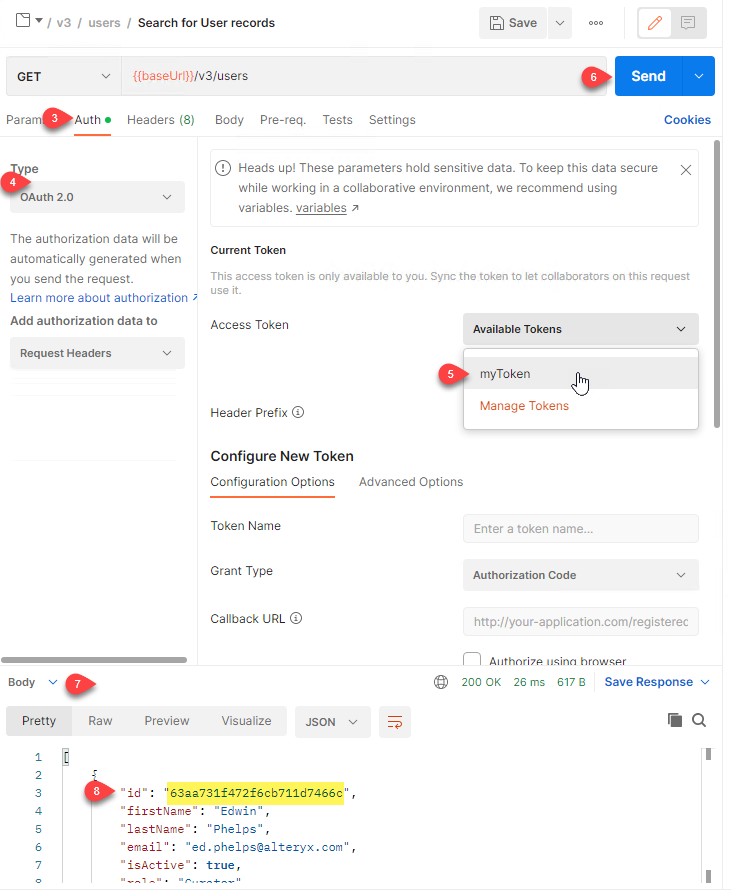

Navigate to GET v3/users.
Deselect all eight Query Params (to search the Users collection, select one or more params and enter search values).
Select the Auth tab.
Set the Type to OAuth 2.0.
Select the token you created above.
Select Send.
View the results at the bottom of the screen.
Copy a UserID to use in the next step.
Get a UserID from the example above or directly in the Server UI (by copying it from the URL when you are viewing the User).
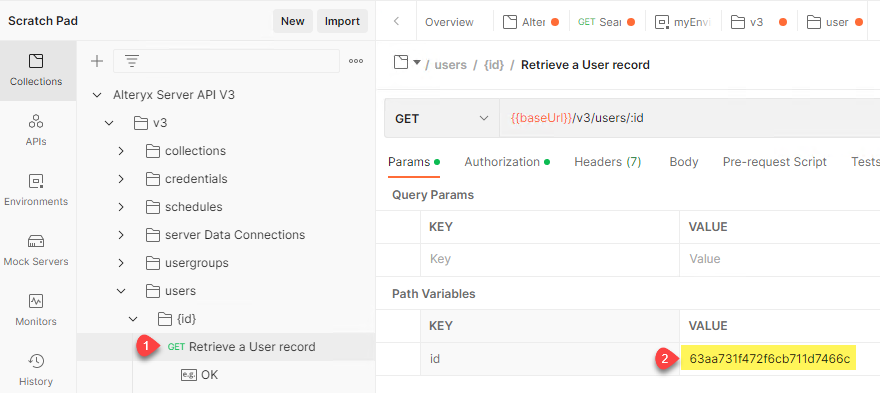

Navigate to the GET v3/users/{id} endpoint.
Enter the UserID as the value of the id param.
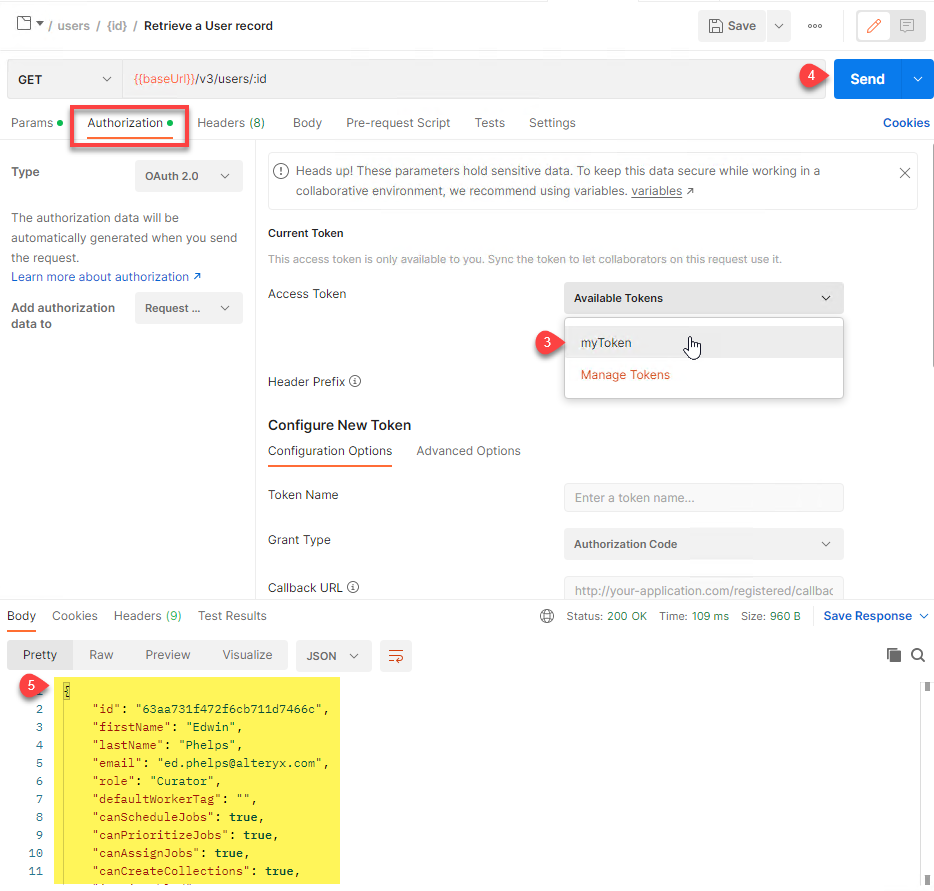
Select your token on the Authorization tab as in the previous step.
Select Send.
Copy the entire JSON object from the Body section at the bottom of the screen (including the leading and trailing curly braces) to use in the next step.
Get a user's detailed information (the JSON object) in the previous step to use in this step.
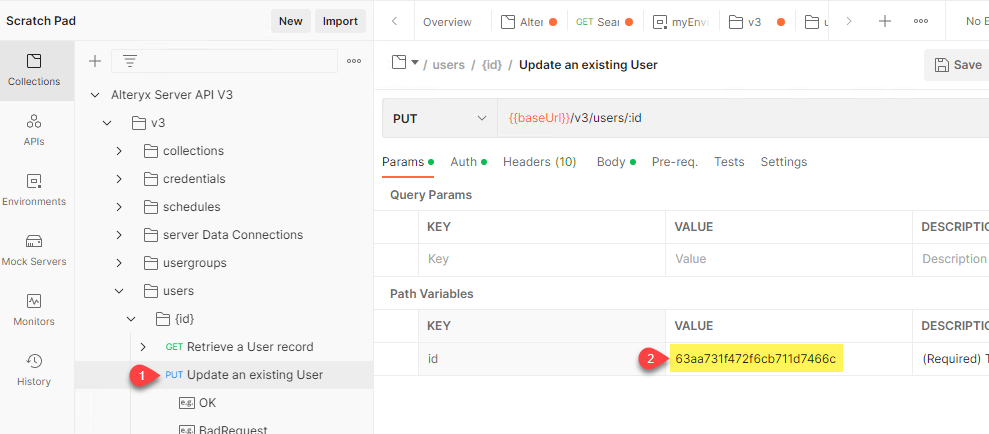
Navigate to the PUT v3/users/{id} endpoint.
Enter the UserID as the value of the id param.
On the Auth tab, select the token as in the previous step.
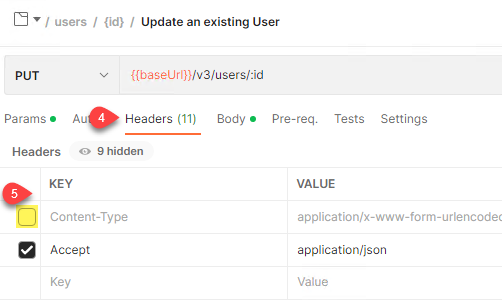
Select the Headers tab.
Deselect the Content-type check box because you do not want to send form data, but a JSON object.
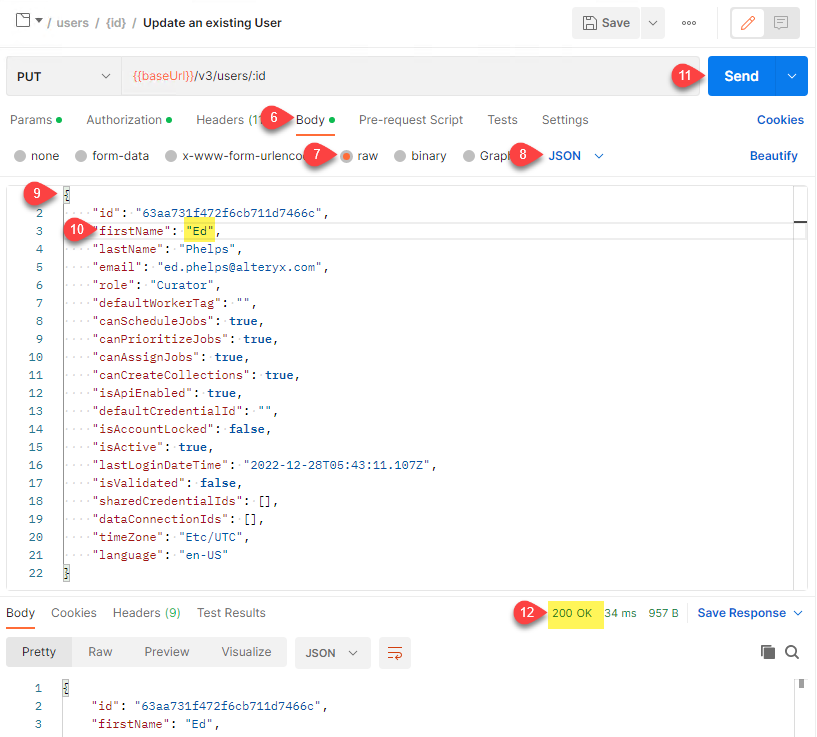
Select the Body tab.
Select raw.
Select JSON.
Paste the JSON object of the user's data.
Edit the data you want to change.
Select Send.
Note the return code 200 OK.