Install for High Availability
The Designer Cloud Powered by Trifacta platform can be installed across multiple nodes for high availability failover. This section describes the general process for installing the platform across multiple, highly available nodes.
The Designer Cloud Powered by Trifacta platform can also integrate with a highly available Hadoop cluster. For more information, see Enable Integration with Cluster High Availability in the Configuration Guide.
Limitations
The following limitations apply to this feature:
This form of high availability is not supported for Marketplace installations.
Job canceling does not work.
When HA is enabled, the restart feature in the Admin Settings page does not work. You must restart using the command line.
The platform must be installed on
/opt/trifactaon every failover node.This feature does not apply to the following components:
Hadoop cluster (See previous link.)
webhdfs/httpfs
Sentry
Navigator
Atlas
any other application/infrastructure with which the Designer Cloud Powered by Trifacta platform can integrate
For more information, see Configure for High Availability in the Configuration Guide.
Overview
The Designer Cloud Powered by Trifacta platform supports an Active-Active HA deployment model, which works well at scale. The architecture features a single load balancer sitting in front of multiple nodes running the Designer Cloud Powered by Trifacta platform. Each node:
communicates with the same database
shares the
/opt/trifacta/confand/opt/trifacta/logsdirectories through NFS.
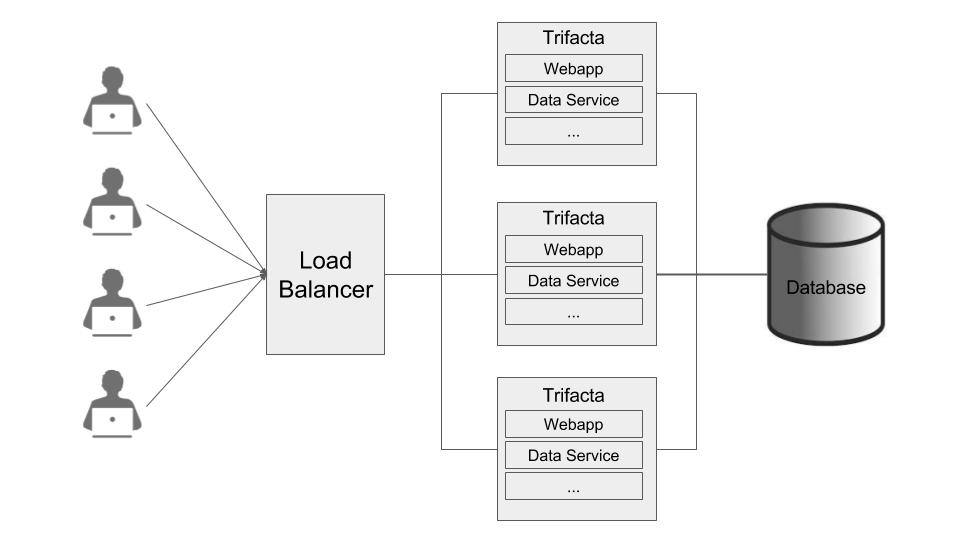 |
Database: PostGreSQL supports HA. The HA-enabled database runs outside of the cluster of platform nodes and appears to each node as a single database. No application code changes are required.
Load balancer: HAProxy is used for its capabilities on health checking the other HA nodes. This load balance periodically checks the health of the other nodes in the setup.
If the health for a given node fails, then the load balancer stops routing traffic to that node while continuing to poll its health.
If the node recovers, the load balancer resumes sending traffic to it.
Node health is described below.
Synchronized configuration: All nodes share the
/opt/trifacta/confmount point, which allows the same configuration files to be visible and accessible on each node.
Job interruption
In case of a failover event, any in-progress job should be marked as failed.
Failover events/scenarios around jobs:
# | Job | Event | Resulting job state |
|---|---|---|---|
1 | In progress | The batch job runner is fine, but executor running the job fails. | Failed |
2 | In progress | The batch job runner or the node dies. | In Progress |
3 | Queued | The batch job runner or the node dies. | In Progress1 |
4 | Pending | The batch job runner or the node dies. | In Progress1 2 |


1 It may not be "In Progress". However, the job has not truly failed.
2 A nuance around #3. There is a feature flag that can be enabled and is enabled by default, which causes pending jobs to be marked as failed on (re)start of batch job runner. However, because this feature indiscriminately marks all pending jobs as failed, it cannot be safely enabled in an environment that has multiple running batch job runners.
Installation Topography
The Designer Cloud Powered by Trifacta platform supports a single load balancer placed in front of multiple nodes, each of which runs the same version of Designer Cloud Powered by Trifacta Enterprise Edition. Content between nodes is shared using an NFS resource mount.
master node: This node is the default one used for hosting and serving the Designer Cloud Powered by Trifacta platform. Example node information:
NFS Server Hostname: server.local
NFS Server IP Address: 192.168.1.101
client node(s): These nodes are failover nodes in case the master node is unavailable. Example node information:
NFS Client Hostname: client.local
NFS Client IP Address: 192.168.1.102
load balancer: This documentation references set up for HAProxy as an example. If you are using a different load balancer, please consult the documentation that came with your product.
Shared resources:
Each node shares the following resources:
Alteryx databases
Directories shared via NFS mount:
/opt/trifacta/logs
/opt/trifacta/conf
Order of Installation
Steps:
All nodes must meet the system requirements. See System Requirements in the Planning Guide.
All nodes must have the appropriate ports opened. See System Ports in the Planning Guide.
Install the databases.
Note
The databases must be installed in a location that is accessible to all nodes.
Note
When installing databases for high availability access, you should deploy standard access and replication techniques that are consistent with the policies of your enterprise.
See Install Databases in the Databases Guide.
Complete the installation process for the server node.
Note
After install, do not start the Trifacta node.
See Install Software.
Repeat the above process for each of the client nodes.
The software is installed on all nodes. No node is running the software.
Configuration
Additional configuration is required.
Note
Starting and stopping the platform in high availability mode requires additional steps.
For more information, see Configure for High Availability in the Configuration Guide.