Microsoft SQL Data Warehouse Table Settings
When you select a Azure® Synapse Analytics (Formerly Microsoft® SQL DW)® connection to publish your job results, you can configure the following options for the generated table.
For more information on creating these connections, see Microsoft SQL Data Warehouse Connections.
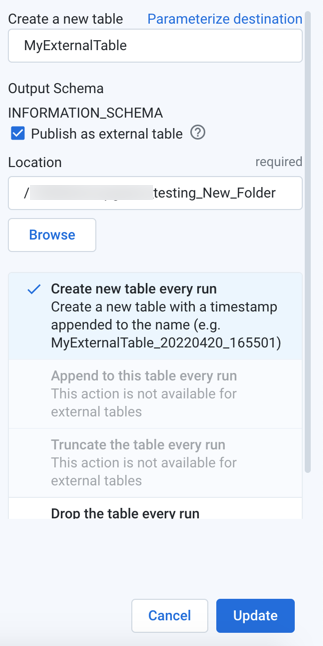
Figure: Microsoft SQL Data Warehouse table settings
Steps:
Select location: Navigate the Azure Synapse Analytics (Formerly Microsoft SQL DW) browser to select the schema to which to publish.
To create a new table, click Create a new table.
Select table options:
Table name:
New table: enter a name for it. You may use a pre-existing table name, and schema checks are performed against it.
Existing table: you cannot modify the name.
Output schema: To change the schema to which you are publishing, click the connection icon in the sidebar. Select a different schema.
Optional table types: The following options may be available:
Publish as external table: Output is published as an external table to the specified location in your storage layer. Otherwise, the table is published as a managed table.
Note
When publishing to an external table, the output file type is Parquet.
Note
When publishing to an external table under ADLS user mode, the system credentials are used to write to the storage location and must have the appropriate permissions.
Publish actions: Depending on your selection or selections above, the following publishing actions on the table are supported. For more information, see "Publish Actions" below.
Create new table every run: Each run generates a new table with a timestamp appended to the name.
Append to this table every run: Each run adds any new results to the end of the table.
Note
Appending the table is not supported for external tables.
Truncate the table every run: With each run, all data in the table is truncated and replaced with any new results.
Note
Truncating the table is not supported for external tables.
Drop the table every run: With each run, the table is dropped (deleted), and all data is deleted. A new table with the same name is created, and any new results are added to it.
Note
If the target is an external table, you can only drop the table when you first re-run a job to the target, after which you can choose to recreate the target as a managed or external table.
To save the publishing action, click Add.