Box
The Box connector lets you connect to Box storage in Designer. Box is available as a data source in the Input Data and Output Data tools, letting you read from and write to Box directly in your Designer workflows.
重要
New Connector Version in Designer
If your workflow uses the standalone Box Input or Box Output tools, those are now deprecated. Instead, use connector version 3.0.0 or later with the Input Data and Output Data tools. Use the workflow migration utility to update existing workflows.

If you want to update the Box connector in your Designer workflows, you can use the workflow migration utility.
Prerequisites
Requirement | Detail |
|---|---|
Designer Version |
|
Connector Version | Box version 3.0.0 or later. Available from Designer Add-Ons. |
Box Permissions | See Box App Registration. |
DCM | You must enable DCM in Designer. Go to Options > Advanced Settings > DCM to enable it. |
Network Access | Outbound access to Box and Box OAuth endpoints. |
Box Connector Details
Box is available in Designer Desktop 2025.1 Patch 5 and later as a data source for the Input Data and Output Data tools. To learn more about the file type options, go to Read Data from Box or Write Data to Box .
コネクタ1.0.0リリースノート(Python)
ID | 説明 |
|---|---|
v3.0.0 |
Known Issue
|
Install the Connector
You can easily install the latest version of the Box connector from Designer via the Add-Ons. This is the recommended installation method that allows you to browse, install, and update connectors without leaving Designer or visiting the Alteryx Marketplace.
To install the connector…
In Designer, go to Add-Ons > Manage Marketplace Add-Ons. You will see a list of available connectors.
Select Box Tools Connector and select Install. Designer downloads and installs the package. Designer might require a restart to complete the installation.
After installation and setup are complete, the Box connector is available from the Input Data and Output Data tools.
Set Up a Connection
To connect to Box connector using DCM...
Drag the Input Data or Output Data tool to the canvas, and select Connect to Data.
In the Connector Setup, select Create or Browse a Data Connection.
If you've created a Box connection before, you can select the connection from the Recents tab.
Select + New. From the list of technologies, select Box.
Enter the Connection Name and Data Source Name.
In the Credentials section, select your authentication method, and enter the credentials. For more information, see Authentication Methods.
Select Save. You can also select Test Connection to validate your credentials before saving.
Select Connect. Box may request authentication.
Select the read or write configuration in the Options window. To know more about the options, see to Read Data from Box or Write Data to Box .
Select Confirm to create a connection to the file. You can continue building your workflow.
You can use the same Box connection in both the Input Data and Output Data tools.
Workflow Migration
If your existing workflows use the deprecated Box Input or Box Output tools, you need to migrate them to use the new connector. Use the workflow migration utility to update existing workflows. The utility requires Designer 2025.2 Patch 3 or later.
The utility previews all the changes and replaces deprecated tool instances with the new connector versions without breaking the workflows.
Review the Changed Behavior and Limitations sections before you migrate.
注記
Your existing Box connections may need to be recreated. Connections created with Box connector version 2.5.8 and earlier do not automatically become version 3.0.0 connections.
Authentication Methods
Box supports four authentication methods. Use the table below to choose the right one for your use case.
Method | Details |
|---|---|
Built-in |
|
Custom App |
|
Access Token |
|
JWT app auth |
|
All four methods support Test Connection, which validates your credentials before you save the connection.
Changed Behavior from Previous Version
Review the changed behavior from version 2.5.8.
Shared links are accessed with the Raw Path feature. Not an authentication method.
Include subfolders checkbox is part of the Download File or Folder input option, which handles files and folders together.
The legacy option Rename is now Create a New File, which appends a timestamp rather than a unique number.
Limitations
You can use the Modify option in Box Output to append data to an XLSX file. Box connector versions 2.5.8 and earlier also support appending data to CSV and YXDB files. In version 3.0.0, Append is supported for XLSX files only.
The Upload File to Box output option is not available in version 3.0.0. It will be part of an upcoming release.
Box connector version 3.0.0 is available in Designer Desktop. Support for Alteryx One is planned for a later release.
Desktop Automation (Scheduler) is not supported by this connector.
Workflows that contain the Box connector must use the AMP engine.
データ接続マネージャー
Boxツールバージョン2.5.0以降では、データ接続マネージャー をサポートしているため、資格情報をより簡単かつ安全に保存できます。Boxへの接続を作成し、Boxツールを含むワークフローで保存された資格情報を簡単に再利用できます。Alteryx Serverで公開ワークフローを正常に実行するには、保存された資格情報が必要です。
The Box tools version 2.5.0 and later also support Data Connection Manager.
AMP Engineの有効化
Boxツールバージョン2.5.0以降を含むワークフローで AMP Engine が有効になっていることを確認し、Designerの機能を最大限に活用してください。
Box アプリの登録
Box資格情報を使用して https://alteryx.app.box.com/developers/console にログインします。
[アプリの新規作成] を選択します。
[カスタムアプリ] を選択します。
[認証方法] で、[ユーザー認証(OAuth 2.0)] を選択します。アプリ名 を入力して、[アプリの作成] を選択します。
アプリケーションスコープ の [設定] タブで [Boxに格納されているすべてのファイルとフォルダーの書き込み] を選択して、アプリに権限を付与します。
[変更を保存] を選択します。
新しい開発者トークンを生成するには、[取り消し] を選択して、[Generate Developer Token] を選択します。
認証には、OAuth 2.0資格情報 から クライアントID と クライアントシークレット を使用できます。
カスタムアプリケーションのセットアップ
OAuth 認証またはアクセストークンと JWT でアプリを使用する際、Box CORS の問題を回避するには、カスタム設定を使用します。
OAuth 認証を使用する Box アプリ:
リダイレクト URI https://cef.alteryx.com/designer/oauthcallbackを追加して、CEFウィンドウのCORSの問題を解決します。

[許可する送信元] には「
file://*」を入力します。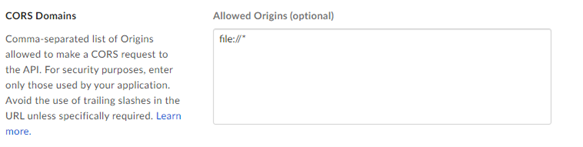
アクセストークンと JWT 認証を使用する Box アプリ:
[許可する送信元] には「
file://*」を入力します。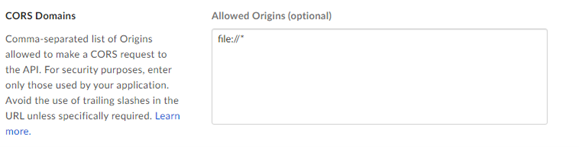
We have deprecated the below standalone Box tools. Install the latest Box Connector to leverage the newest features.

Boxコネクタを使用して、Boxワークスペースに保存されているファイルを利用することで、Designerからワークフローの実行、スケジュール設定、公開を行います。サポートされているファイルの種類はXLSX、CSV、YXDBです。
2025年12月8日
ID | 説明 |
|---|---|
TPM-5038 |
|
TPM-5006 |
|
TPM-4984 |
|