HashiCorp 配置
设置外部加密保管库连接
将数据连接管理器 (DCM) 连接到您的 HashiCorp 实例,以便稍后可将 HashiCorp 的身份验证数据获取到您的工作流中。
转到文件 > 管理连接,以打开 DCM。
选择左下角的外部加密保管库。
选择 + 新建按钮,向 DCM 添加新的加密保管库。
选择您使用的 HashiCorp Vault 技术。在版本 1 和版本 2 中,仅支持 KV 密钥引擎。
为此加密保管库连接输入自定义名称。
然后,输入您的 HashiCorp Vault 的 URL 和命名空间并选择保存。例如:
URL:
https://vault.your-company.hashicorp.cloud:8200命名空间:
Namespace1
选择 + 连接凭证,然后在凭证下拉列表中选择创建新凭证。
根据您选择的身份验证方式填写相关字段以访问 HashiCorp(使用基本身份验证/LDAP:填写用户名和密码;使用 OIDC:填写客户端 ID 与私密密钥;使用 mTLS:填写证书)。
选择创建并链接。
现在,您在创建新凭证时可选择此新建的加密保管库。

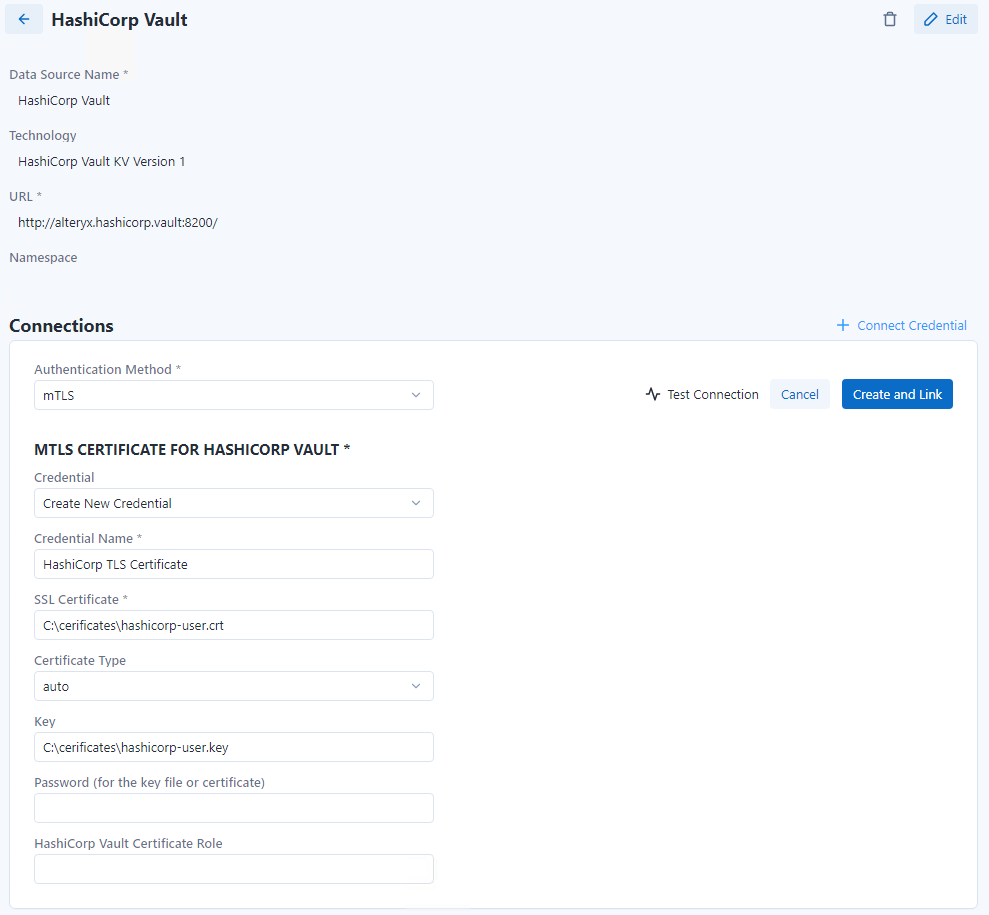
mTLS 证书配置
要为 HashiCorp Vault 配置 mTLS 证书凭证,您需要填写以下信息:
凭证名称:为引用创建的凭证选择一个自定义名称。
SSL 证书:指定证书文件路径,支持下文列出的类型。
证书类型:可选择“自动”、“DER”、“P12”或“PEM”。保持为“自动”,系统将根据文件扩展名自动确定证书类型。
密钥:如果 SSL 证书不包含密钥文件,请提供密钥本身的文件路径。唯一支持的文件类型是 .key。
密码:如果文件受保护,请输入密钥(或单个文件的证书)的密码。
HashiCorp Vault 证书角色:您可以根据您在 HashiCorp Vault 中的证书角色配置,酌情指定用于身份验证的所需角色。
所有证书和私钥文件都应存储在本地,并遵循存储敏感数据的一般最佳实践。
可以通过网络路径访问文件。此行为取决于操作系统,DCM 对此类差异并不感知,也不提供任何保证。
要使用网络中的文件,请在相应字段填写其完整网络路径(例如,\\192.168.1.130\mtls\user.crt)。要确保在工作流运行期间能够使用所有网络文件,必须保证这些文件是可访问的。在 Designer 中,这表示当前操作系统用户。在 Alteryx Server 中,这表示运行 Gallery 节点的计算机上的管理员。也可以使用网络映射驱动器,但同样的规则也适用——必须为用户和管理员正确设置网络映射。
注意
现在,所有加密保管库 API 请求都支持双向 TLS (mTLS) 证书,而不仅仅是初始身份验证。以前,mTLS 仅在登录期间用于获取身份验证令牌。更新后的实现方式现在会在每个后续请求中提供客户端证书,从而确保与在每个端点上强制执行 mTLS 的加密保管库配置兼容。
身份验证令牌不会存储在 DCM 中。它仅在请求期间存在于内存中,并在操作完成后被安全清除。此增强功能确保与加密保管库配置完全兼容,该配置在每个端点上强制执行 mTLS,同时坚持严格的安全性和令牌管理标准。
使用外部加密保管库创建新凭证
创建新的 DCM 凭证。此凭证将通过外部加密保管库连接从 HashiCorp 获取身份验证数据。
转到文件 > 管理连接,以打开 DCM。
选择左上角的凭证。
选择 + 添加凭证按钮以添加新凭证。
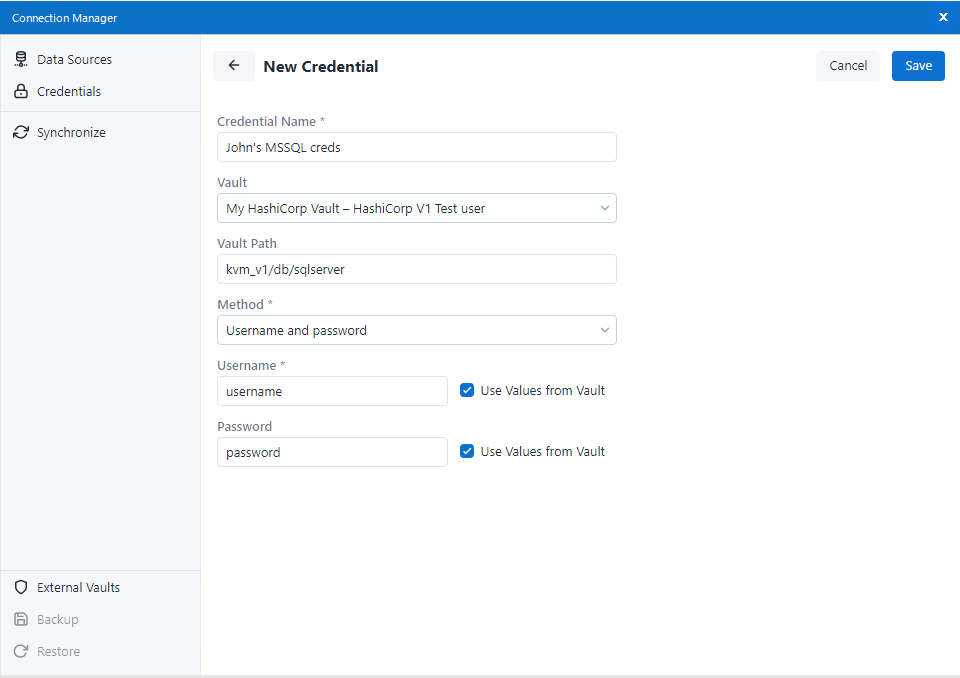
输入新凭证的名称。
在加密保管库下拉菜单中,选择先前创建的 HashiCorp 实例。
在“加密保管库路径”字段中,填入 HashiCorp Vault 中身份验证数据的路径。
例如,若您在 HashiCorp 中保存了 Microsoft SQL 数据库的用户名和密码,则路径可能为:“vault_name/databases/mssql”。
为了从加密保管库读取私密密钥值,系统会使用 HCV HTTP API。因此,请求的构造方式会有所不同。但是,对于 KV 私密密钥引擎的 v1 和 v2 两个版本,在 DCM 中输入的加密保管库路径保持不变。
对于 KV 版本 1,请求 URL 构造为 [vaultUrl]/v1/secret/[vaultPath],例如 https://my-vault.hashicorp.cloud/v1/secret/vault_name/database/mssql。
对于 KV 版本 2,请求 URL 构造为 [vaultUrl]/v1/secret/data/[vaultPath],例如 https://my-vault.hashicorp.cloud/v1/secret/data/vault_name/database/mssql。
然后,选择您首选的身份验证方法。此方法应与您要从 HashiCorp 获取的身份验证数据相匹配。
例如,如果我想从 HashiCorp 获取用户名和密码,那么将选择“用户名和密码”选项。
如需从 HashiCorp 获取身份验证数据,请确保选中使用加密保管库中的值复选框。然后,每个对应的字段都应该包含该值在 HashiCorp 中保存时使用的密钥。
例如,如果我的用户名保存在 HashiCorp 中名为“SQLUsername1”的键下,则我将选中“使用加密保管库中的值”并在“用户名”字段中输入“SQLUsername1”。
选择保存。
现在,您可以在配置工作流工具时,将此新创建的凭证用于相应的数据源。
在工作流中使用凭证
您可以在工作流中使用您的新凭证。此流程与使用 DCM 中存储的凭证相同。
首先,创建一个新的工作流,并添加一些输入数据工具或输出数据工具。
例如,可以添加输入数据工具。
确保将该工具配置为使用 DCM(在我的输入数据工具中选中使用数据连接管理器 (DCM) 复选框)。
设置连接并选择所需的技术。
例如,在我的输入数据工具中选择“MSSQL Server 快速连接”。
连接管理器窗口打开后,选择现有数据源或创建新数据源。
选择 + 连接凭证,然后选择先前创建的凭证(从 HashiCorp 获取身份验证数据的凭证)。
例如,我将选择我命名为“John's MSSQL Creds”的凭证。
选择创建并链接。
选择连接。
现在,连接设置完成。您可以继续配置与数据源技术相关的任何特定详细信息(例如,选择数据库表、记录限制等)。
工作流准备就绪后,请运行它,以验证您是否使用从 HashiCorp Vault 获取的凭证对数据源进行了正确的身份验证。