Publishing Actions
You can add, remove, or edit the outputs generated from this job. By default, a CSV output for your home directory on the selected datastore is included in the list of destinations, which can be removed if needed. You must include at least one output destination.
Columns:
Actions: Lists the action and the format for the output.
Location: The directory and filename or table information where the output is to be written.
Settings: Identifies the output format and any compression, if applicable, for the publication.
Actions:
To change format, location, and settings of an output, click the Edit icon.
To delete an output, click the X icon.
Add Publishing Action
From the available datastores in the left column, select the target for your publication.
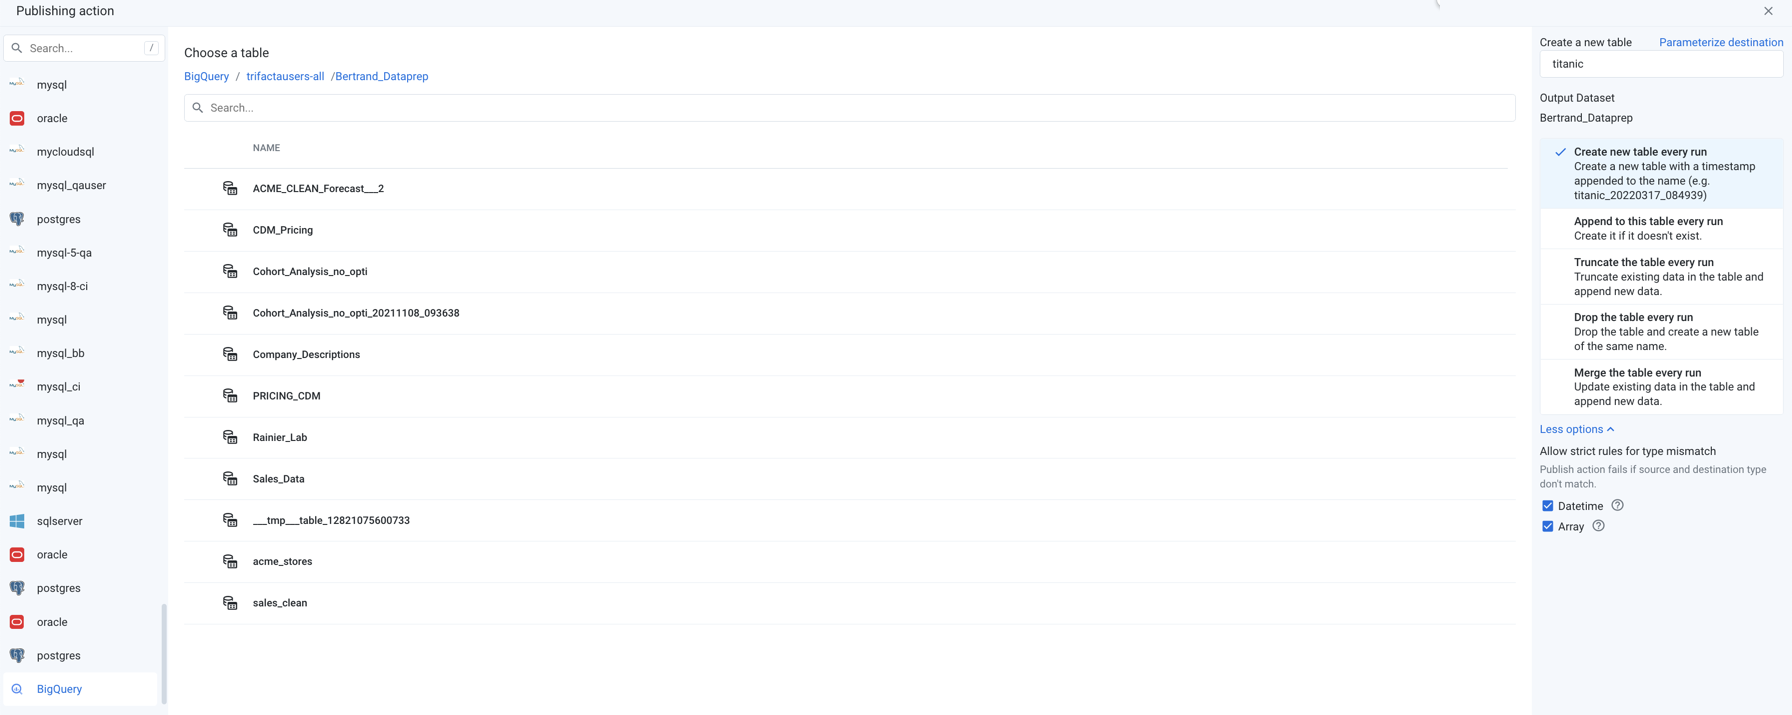
Figure: Add Publishing Action
Note
Do not create separate publishing actions that apply to the same file or database table.
New/Edit: You can create new or modify existing connections. By default, the displayed connections support publishing. See Create Connection Window.
Steps:
Select the publishing target. Click an icon in the left column.
BigQuery: You can published your results to the current project or to a different one to which you have access.
Note
You must have read and write access to any BigQuery database to which you are publishing.
To publish to a different project, click the BigQuery link at the front of the breadcrumb trail. Then, enter the identifier for the project where you wish to publish your job results.
Note
Your projects and their identifiers are available for review through the Dataprep by Trifacta menu bar. See UI Reference.
Click Go. Navigate to the database where you wish to write your BigQuery results.
For more information, see BigQuery Connections.
Locate a publishing destination: Do one of the following.
Explore:
Note
The publishing location must already exist before you can publish to it. The publishing user must have write permissions to the location.
For Cloud Storage, you can create a new folder in an accessible location.
Tip
To show hidden files and folders, select Show hidden. Overwriting hidden files and folders can result in unexpected behaviors in your Alteryx objects.
To sort the listings in the current directory, click the carets next to any column name.
For larger directories, browse using the paging controls.
Use the breadcrumb trail to explore the target datastore. Navigate folders as needed.
Search: Use the search bar to search for specific locations in the current folder only.
Manual entry: Click the Edit icon to manually edit or paste in a destination.
Create Folder: Depending on the storage destination, you can click it to create a new folder for the job inside the currently selected one. Do not include spaces in your folder name.
Create a new file: Enter the filename under which to save the dataset.
Select the Data Storage Format.
For more information, see Output Settings below.
BigQuery: When publishing to BigQuery, you must specify the table to which to publish and related actions. See below.
As needed, you can parameterize the outputs that you are creating. Click Parameterize destination in the right panel. See Parameterize destination settings below.
To save the publishing destination, click Add.
To update a publishing action, hover over its entry. Then, click Edit.
Todeletea publishing action, selectDeletefrom its context menu.
Variables
If any variable parameters have been specified for the datasets or outputs of the flow, you can apply overrides to their default values. Click the listed default value and insert a new value. A variable can have an empty value.
Note
Override values applied to a job are not validated. Invalid overrides may cause your job to fail.
Note
Unless this output is a scheduled destination, variable overrides apply only to this job. Subsequent jobs use the default variable values, unless specified again. No data validation is performed on entries for override values.
Tip
At the flow level, you can specify overrides at the flow level. Override values are applied to parameters of all types that are a case-sensitive match. However, values that are specified at runtime override flow-level overrides. For more information, see Manage Parameters Dialog.
For more information on variables, see Overview of Parameterization.
Output Settings
Depending on the type of output that you are generating, you must specify additional settings to define location, format, and other settings.
See File Settings.
File Settings
When you generate file-based results, you can configure the filename, storage format, compression, number of files, and the updating actions in the right-hand panel.
Note
By default, when scheduled or API jobs are executed, no validations are performed of any write settings objects for file-based outputs. Issues with these objects may cause failures during transformation or publishing stages of job execution. Jobs of these types should be tested through the Trifacta Application first. A workspace administrator can disable the skipping of these validations.
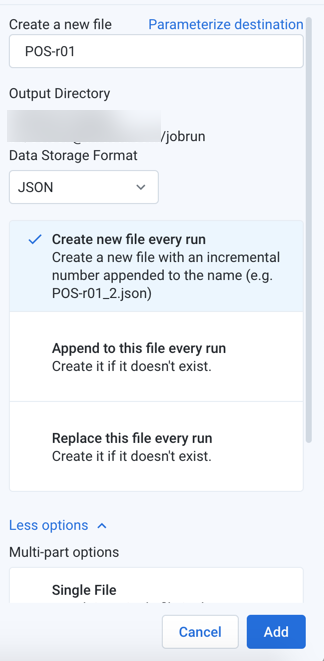
Figure: Output File Settings
Configure the following settings.
Create a new file: Enter the filename to create. A filename extension is automatically added for you, so you should omit the extension from the filename.
File output paths can have a maximum length of 2048 characters.
Output directory: Read-only value for the current directory. To change it, navigate to the proper directory.
Note
During job execution, a canary file is written for each set of results to validate the path. For datasets with parameters, if the path includes folder-level parameterization, a separate folder is created for each parameterized path. During cleanup, only the the canary files and the original folder path are removed. The parameterized folders are not removed. This is a known issue.
Data Storage Format: Select the output format you want to generate for the job.
Avro: This open source format is used widely for data serialization and data transfer between systems.
CSV and JSON: These formats are supported for all types of imported datasets and all running environments.
Note
JSON-formatted files that are generated by Dataprep by Trifacta are rendered in JSON Lines format, which is a single line per-record variant of JSON. For more information, see http://jsonlines.org.
Parquet: This format is a columnar storage format.
For more information, see Supported File Formats.
Publishing action: Select one of the following:
Note
OTE: If multiple jobs are attempting to publish to the same filename, a numeric suffix (
_N) is added to the end of subsequent filenames (e.g.filename_1.csv).Note
If a single user executes two jobs with the same output settings except for different methods (e.g. create vs. replace) on the same output destination, the generated results and potential error conditions are unpredictable. Please wait for the first job to complete execution before changing the configuration for the second job.
Create new file every run: For each job run with the selected publishing destination, a new file is created with the same base name with the job number appended to it (e.g.
myOutput_2.csv,myOutput_3.csv, and so on).Append to this file every run: For each job run with the selected publishing destination, the same file is appended, which means that the file grows until it is purged or trimmed.
Note
The
appendaction is not supported when publishing to S3.Note
Compression of published files is not supported for an
appendaction.Replace this file every run: For each job run with the selected publishing destination, the existing file is overwritten by the contents of the new results.
More Options:
Include headers as first row on creation: For CSV outputs, you can choose to include the column headers as the first row in the output. For other formats, these headers are included automatically.
Note
Headers cannot be applied to compressed outputs.
Include quotes: For CSV outputs, you can choose to include double quote marks around all values, including headers.
Include mismatched values: For CSV outputs, you can choose to include any value that is mismatched for its column data type. When disabled, mismatched values are written as null values.
Delimiter: For CSV outputs, you can enter the delimiter that is used to separate fields in the output. The default value is the global delimiter, which you can override on a per-job basis in this field.
Tip
If needed for your job, you can enter Unicode characters in the following format:
\uXXXX.Single File: Output is written to a single file. Default setting for smaller, file-based jobs.
Multiple Files: Output is written to multiple files. Default setting for larger file-based jobs.
Compression: For text-based outputs, compression can be applied to significantly reduce the size of the output. Select a preferred compression format for each format you want to compress.
To save the publishing action, click Add.
Parameterize Destination Settings
For file- or table-based publishing actions, you can parameterize elements of the output path. Whenever you execute a job, you can pass in parameter values through the Run Job page.
Note
Output parameters are independent of dataset parameters. However, two variables of different types with the same name should resolve to the same value.
Note
During job execution, a canary file is written for each set of results to validate the path. For datasets with parameters, if the path includes folder-level parameterization, a separate folder is created for each parameterized path. During cleanup, only the the canary files and the original folder path are removed. The parameterized folders are not removed. This is a known issue.
Supported parameter types:
Timestamp
Variable
For more information, see Overview of Parameterization.
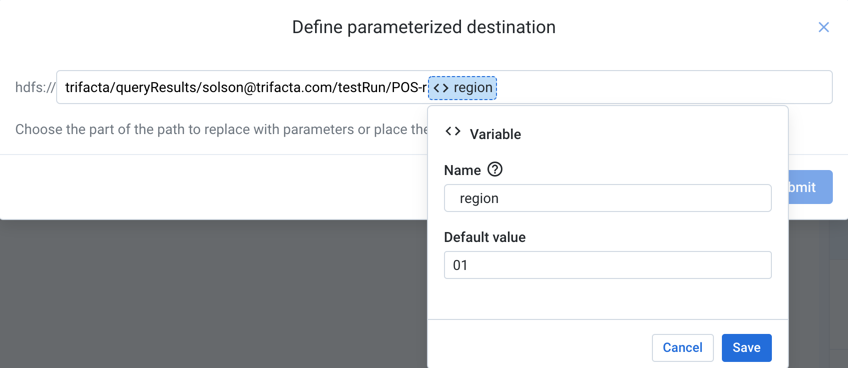
Figure: Define destination parameter
Steps:
When you add or edit a publishing action, click Parameterize destination in the right panel.
On the listed output path, highlight the part that you wish to parameterize. Then, choose the type of parameter.
For Timestamp parameters:
Timestamp format: Specify the format for the timestamp value.
Timestamp value: You can choose to record the exact job start time or the time when the results are written relative to the job start time.
Timezone: To change the timezone recorded in the timestamp, click Change.
For Variable parameters:
Name: Enter a display name for the variable.
Note
Variable names do not have to be unique. Two variables with the same name should resolve to the same value.
Default value: Enter a default value for the parameter.
To save your output parameter, click Save.
You can create multiple output parameters for the same output.
To save all of your parameters for the output path, click Submit.
The parameter or parameters that you have created are displayed at the bottom of the screen. You can change the value for each parameter whenever you run the job.
Tip
At the flow level, you can specify overrides at the flow level. Override values are applied to parameters of all types that are a case-sensitive match. However, values that are specified at runtime override flow-level overrides. For more information, seeManage Parameters Dialog.
Relational Table Settings
For relational connections that support writing directly to the database, you can configure the following settings to specify the output table in the Run Job page.
Note
You cannot write to multiple relational outputs from the same job.
Steps:
Select location: Navigate the database browser to select the database and table to which to publish.
To create a new table, click Create a new table.
Select table options:
Table name:
New table: Enter a name for it. You may use a pre-existing table name, and schema checks are performed against it.
Existing table: You cannot modify the name.
Output database: To change the database to which you are publishing, click the database icon in the sidebar. Select a different database.
Publish actions: Select one of the following.
Create new table every run: Each run generates a new table with a timestamp appended to the name.
Append to this table every run: Each run adds any new results to the end of the table.
Truncate the table every run: With each run, all data in the table is truncated and replaced with any new results.
Drop the table every run: With each run, the table is dropped (deleted), and all data is deleted. A new table with the same name is created, and any new results are added to it.
To save the publishing action, click Add or Update.