Getting Started with Dataprep by Trifacta
Dataprep by Trifacta enables you to rapidly transform disparate datasets of any size into usable data for the entire enterprise. Ingest, explore, and transform your data through a leading-edge interface, reducing the time to prepare your data from weeks to minutes. Dataprep by Trifacta is integrated with the Google Cloud Platform and operated by partner Alteryx.
Applicable Product Editions
These setup instructions apply to the following editions of the product:
Note
These product editions are licensed through the Google Marketplace from Alteryx. For more information on licensing or upgrading from Dataprep by Trifacta, please see the Google Marketplace listing.
Enterprise Edition
Professional Edition
Starter Edition
Premium Edition
Standard Edition
Legacy Edition
Note
If you are an existing Legacy Edition customer, you can use the Marketplace to upgrade to one of the supported Marketplace editions or to enable your current product edition for a new project. You can also choose to continue using Legacy Edition.
For more information, see Product Editions.
For more information on available plans, see https://www.trifacta.com/pricing/cloud-dataprep/.
Support packages
Alteryx offers a range of support packages. For more information, please contact Alteryx Support.
Prerequisites
Before you begin, please review the following prerequisites.
Note
The name of the service account used by the product is provided by Google and cannot be modified.
Note
If domain restricted sharing has been enabled as a policy in your enterprise, you must add a trust policy for the Alteryx GSuite domain. If you do not have the ID for this domain, it can be provided by Alteryx Support.
Review Org policy
The Google Cloud Platform enables a wide range of organization policies, which can determine default behaviors across projects and services. Before you begin, you should review your organization policies. In particular, please review the following organization policy:
Disable Automatic IAM Grants for Default Service Accounts
This policy limits products and services that are enabled in a project from gaining access to the default service accounts that they need to work within the Google Cloud Platform. These service accounts must be managed using finer-grained controls within the enterprise.
When disabled:
Dataprep by Trifacta can use the two required service agents in any project where the product is enabled.
These service agents are:
Dataprep Service Agent: manages design time interactions between Dataprep by Trifacta and Google Cloud Platform
Compute Engine Service Account: manages runtime product interactions with Dataflow
When enabled:
You must manually assign these service agents or create them from scratch.
Note
For effective use of Dataprep by Trifacta, it is recommended that you disable the above organization policy, at least while you are creating projects for use with the product.
For more information, see Google Service Account Management.
Set up a project
To use either product edition, you must have the following already set up in the Google Cloud Platform.
Note
If you are upgrading from Dataprep by Trifacta, you should already have these services enabled.
Create or set up a Google Cloud project. In the Cloud Console, on the project selector page, select or create a Cloud project.
Note
If you don't plan to keep the resources that you create in this procedure, create a project instead of selecting an existing project. After you finish these steps, you can delete the project, removing all resources associated with the project.
Go to the project selector page
Enable billing on that project. Please verify that billing is enabled for your Google Cloud project. Learn how to confirm billing is enabled for your project.
Enable services: In your project, enable the following services:
Dataflow
BigQuery
Cloud Storage APIs. See Enable the APIs.
Set up your storage bucket
On Cloud Storage, you must have a bucket set up for use with your project.
In the Cloud Console, navigate to the Cloud Storage Browser page. See https://console.cloud.google.com/storage/browser.
Click Create bucket.
In the Create bucket dialog, specify the following attributes:
A unique bucket name. For more information on bucket name requirements, see https://cloud.google.com/storage/docs/bucket-naming#requirements.
A storage class. See https://cloud.google.com/storage/docs/storage-classes.
A location where bucket data will be stored.
Click Create.
Set up your staging bucket
By default, when you enable Dataprep by Trifacta in a project, a Cloud Storage staging bucket for Dataflow use is automatically created for you in a U.S. region. This staging bucket is used for staging assets for use on Dataflow jobs and is required for use with the product. If you do have permissions to create a storage bucket in the U.S, you do not need to create a storage bucket for staging and can skip to the next section.
Note
If you do not have permissions to create a Cloud Storage bucket in the U.S., you must your own staging bucket before enabling Dataprep by Trifacta in your project. This name of this bucket must begin with the following text string: dataprep-staging- followed by an identifying value.
A bucket can be created from:
Google Console: https://cloud.google.com/storage/docs/creating-buckets
Google CLI: https://cloud.google.com/storage/docs/gsutil
The staging bucket can be changed:
During enablement of the product in a project. You can select a different staging bucket as needed.
After the product has been enabled, individual users can configure the bucket to use for staging of their assets. See User Profile Page.
Whitelist the IP address range of the Dataprep by Trifacta Service
Note
This feature may not be available in all product editions. For more information on available features, see Compare Editions.
Before you begin creating connections to your relational sources, you must whitelist the IP address range of the Alteryx Service in the relevant security groups.
Note
The database to which you are connecting must be available from the Alteryx Service over the public Internet.
The IP address range of the Alteryx Service is the following:
Note
On the database server for each relational source type (Oracle, SQL Server, etc.), you must whitelist these IP addresses.
For Dataprep by Trifacta:
34.68.114.64/28
For more information, please contact Alteryx Support.
Purchase and enable through the Google Marketplace
After you have completed the above steps, please proceed through the Google Marketplace to complete your purchase. Your purchase covers:
Basic entitlement
Licensing for each Google Cloud projects
Note
Changes to your billing information for a project have been known to cause forced cancellation of Dataprep by Trifacta in a project. If possible, please confirm that the billing information is properly set for the project before you enable the product on it. If you encounter a forced cancellation, please contact Google Support. For more information, see Enable or Disable Dataprep.
For more information, see https://console.cloud.google.com/marketplace/details/trifacta/cloud-dataprep-editions.
Setup
After the product has been licensed for your project, please complete the following steps for your account.
Required permissions
When Dataprep by Trifacta is enabled for your project, the Dataprep.user role is automatically assigned to each permitted user of the project. For basic access, no additional permissions are required.
Note
Depending on the permissions scheme in your enterprise, you may need to enable additional permissions to access features of the product or services in the Google Cloud Platform.
For more information, see Required Dataprep User Permissions.
Additional permissions
Some product editions require special permissions to use the project. For more information, see Create IAM Role for Dataprep.
Enable in the project
Note
Dataprep by Trifacta must be enabled in individual projects by the project owner.
In the Google Cloud Console, select the project in which you wish to enable Dataprep by Trifacta.
Open the product. See https://console.cloud.google.com/dataprep.
As the project owner, you must enable access to project data for Google and Alteryx.
Login
Each user of the project must do the following:
In the Google Cloud Console, select the project in which you wish to enable Dataprep by Trifacta.
Open the product. See https://console.cloud.google.com/dataprep.
Accept the terms of service.
Select a Cloud Storage bucket to use with the product. For more information, see Enable or Disable Dataprep.
The Trifacta Application is displayed.
The Home page is displayed:
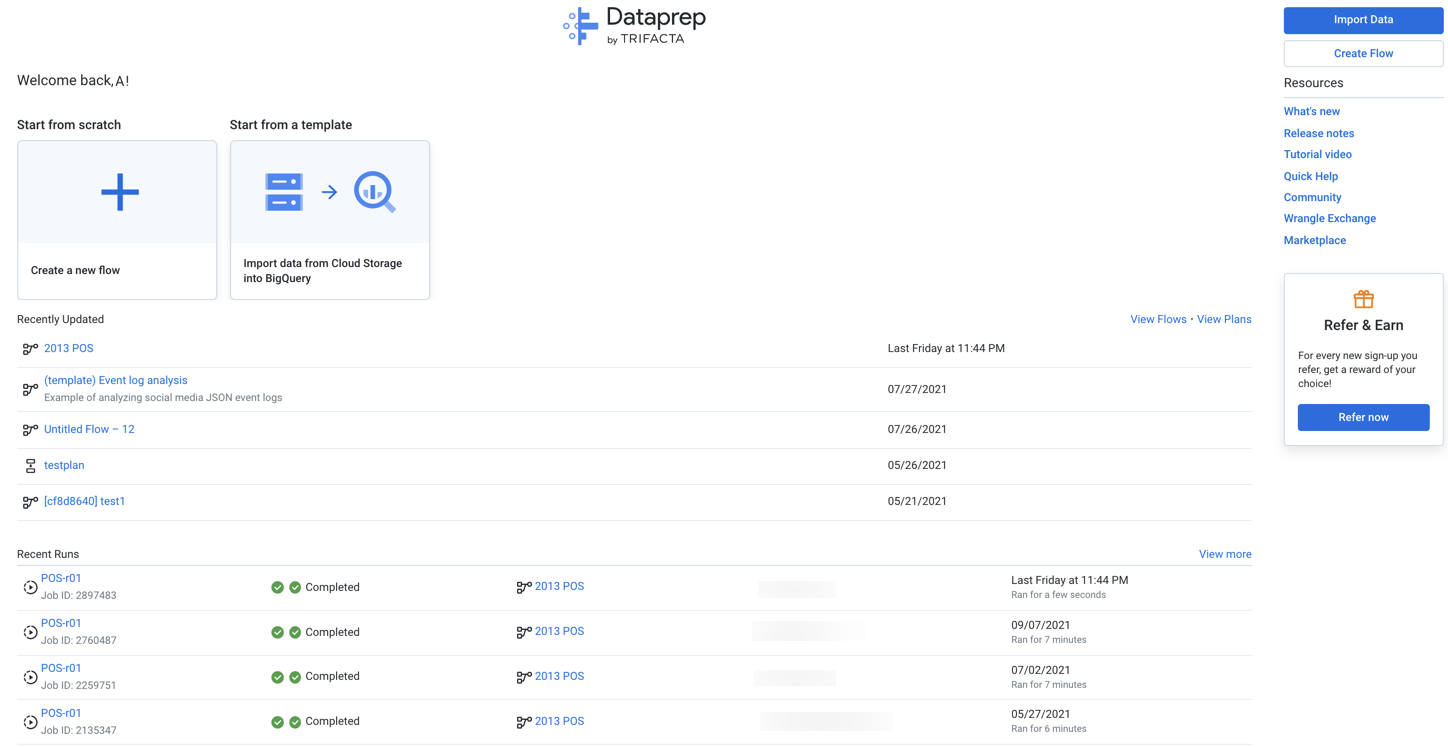
Figure: Home page
Project settings
The project owner should review the settings for your project. See Dataprep Project Settings Page.
Set up directories
Each user must configure the directories on Cloud Storage for use with the product. You can change the directories that are used for uploads, job runs, and temp storage.
In the left nav bar, select the User icon.
In the User menu, select Preferences.
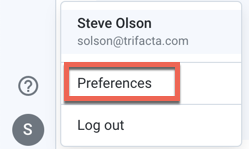
The User Profile page is displayed.
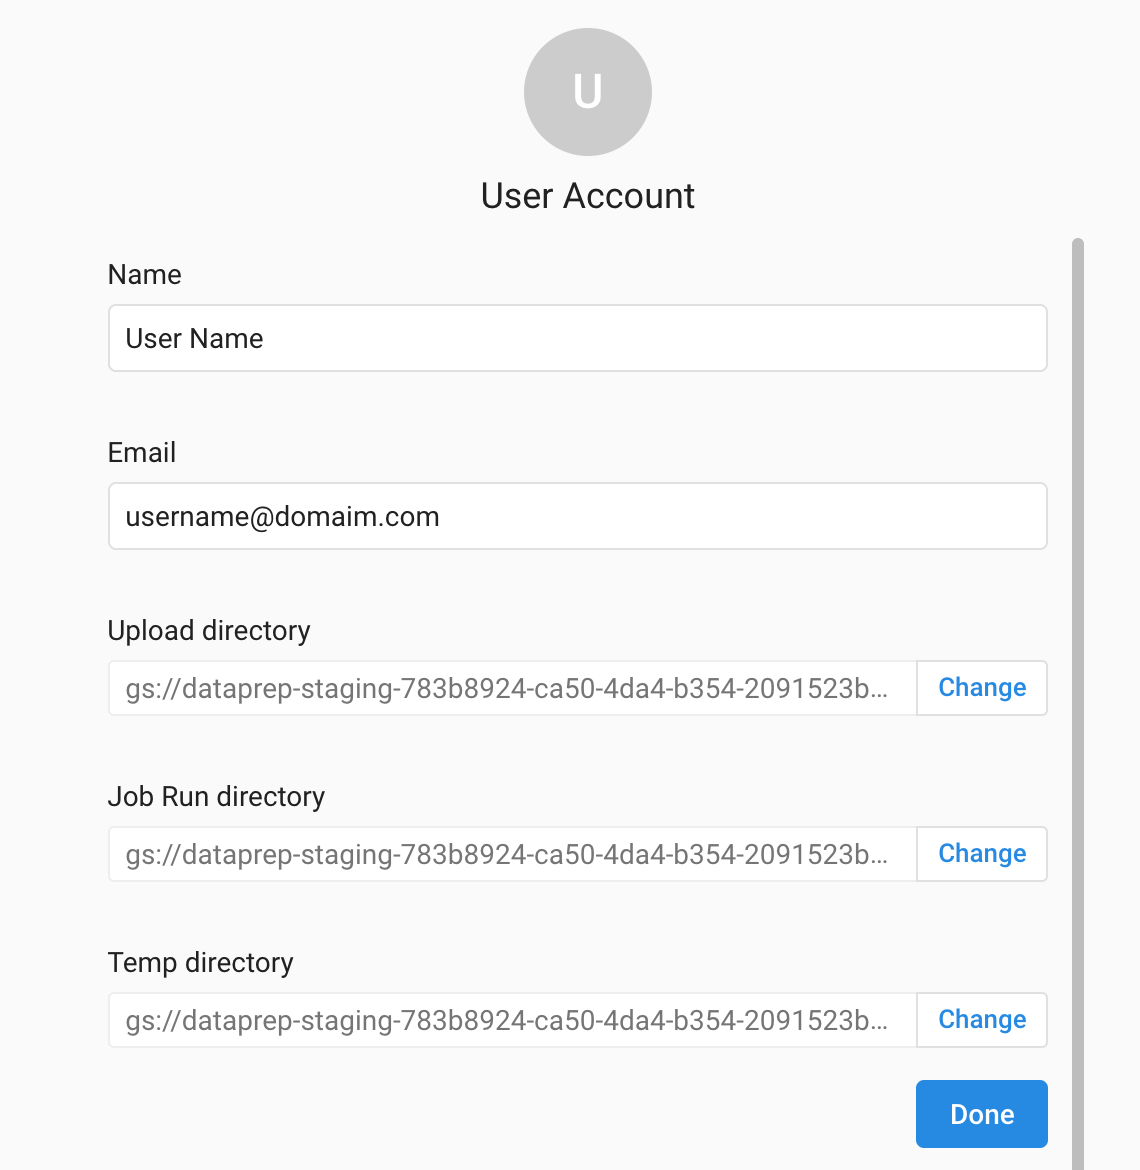
As needed, you can change the Upload, Job Run, and Temp directories in your bucket. To save your changes, click Done.
For more information, see User Profile Page.
Test
If you have completed the above steps, you should verify operations.
Verify operations
Before inviting other users, you should run a simple job through the product.
After you have applied a configuration change to the platform and restarted, you can use the following steps to verify that Dataprep by Trifacta platform is working correctly.
Verify IP address whitelisting
If you have whitelisted the Alteryx service IP addresses for your database server, you can create a connection to the database from inside the Trifacta Application. If you are able to successfully read data into the application from your database, then the whitelist has been specified correctly.
Note
The database to which you are connecting must be available from the Alteryx service over the public Internet.
For more information, see Connection Types.
Invite Users
You can invite other people to join your project at this time.
Note
First-time users of the product should access Dataprep by Trifacta by invitation only. Do not provide direct URLs to first-time users.
For more information, see https://cloud.google.com/iam/docs/quickstart.
Example Flows
When a new workspace is created, the first user is provided a set of example flows. These flows are intended to teach by example and illustrate many recommended practices for building your own flows. For more information on example flows, see Basics.
Resources
The following resources can assist users in getting started with wrangling.
For a quick start of Dataprep by Trifacta products, see Quickstart for Dataprep by Trifacta.
Check out the Alteryx Community : https://community.trifacta.com
Try the free Wrangler certification course. See https://community.trifacta.com/s/certification.
For a basic summary of each step of the wrangling process, see Basics.
Access documentation: To access the full customer documentation, from the left nav bar, select Resources menu > Documentation.
Additional Setup
Depending on your environment, the following additional configuration steps may be required.
To access BigQuery datasets in other projects, see Access Cross-Project BigQuery Datasets.
To access Cloud Storage datasets in other projects, see Access Cross-Project Cloud Storage Buckets.