Create a Plan
A plan is a sequence of tasks that are executed manually or based on a schedule. Use plans to automate the execution of multiple related tasks in Alteryx Analytics Cloud (AAC).
When a plan is triggered:
AAC captures a snapshot of the objects in the plan. This snapshot defines the set of tasks that are executed as part of a plan run.
Note
A snapshot does not capture the assets underlying the tasks. After a snapshot is taken, subsequent changes to the underlying assets could impact the outcome of the tasks when they are later executed during the plan run.
The set of tasks in the plan is triggered in the order listed in the plan.
All of the dependencies for any task are also executed.
If one task fails to execute, the other tasks are not executed.
For more information on plans, go to Overview of Orchestration.
Before You Begin
Before you begin, please verify the following:
You have access to all of the assets that you wish to use in your plan.
Create Plan
To begin, you must create a plan object.
From the AAC landing page, select Plans from the App Switcher.
On the Plans page, select New. A new plan with the name
Untitled plan - Xis created, whereXis a number.Select the
Untitled plan - Xto enter a plan name and description.Your plan is saved and displayed in Plan View.
In Plan View, you create the objects that are part of your plan. These include:
Plan Schedule: A schedule is composed of one or more triggers that determine when the plan is executed.
Trigger: Scheduling object that determines the conditions under which the plan is executed.
A schedule can contain one or more triggers.
Task: An action that is executed when triggered.
You can build a sequence of one or more tasks in your plan.
Create Task
Identify the tasks that you wish to execute.
Note
You must have access to any assets that you wish to execute as tasks.
In the Plan View page, drag and drop the task type to the plan canvas. The task details and configuration options are displayed on the right side.
Select the task, and configure it as needed.
Add additional tasks as needed.
To test your plan, select Run. The plan is immediately queued for execution.
Edit the plan and repeat the above steps until the plan is ready for production runs.
Tip
While a plan is in development, you may wish to disable its schedule, which prevents execution according to the schedule. You can still run test executions using the Run button.
To create the schedule, select Schedule.
Specify one or more triggers for the schedule. When a trigger occurs, the plan is queued for execution.
When ready, the plan runs at the time scheduled in the trigger.
Task Types
The following types of tasks are available.
Workflow task: A workflow task allows you to execute one of your Designer Cloud workflows as part of a plan that you create in the Alteryx Analytics Cloud.
Desktop Workflow task: Orchestrate the execution of your Designer Desktop workflows that were uploaded to Alteryx Analytics Cloud.
Report task: Create and export a report from the data you've prepped and blended in AAC. Go to Plan View for Report Tasks.
Flow task: For more information, go to Plan View for Flow Tasks.
ML Prediction task: Make predictions on new data with your Machine Learning project.
ML Upload task: Upload new training data to your Machine Learning project.
HTTP task: A request submitted to a third-party server as part of a plan run. Also, use to generate a dataset with API call response that can be used in Designer Cloud workflow.
Slack task: Send a message with information about the plan run to a specified Slack channel.
Location Intelligence task: Orchestrate your Location Intelligence projects with other tasks. For more information, go to Plan View for Location Intelligence Tasks.
Auto Insights task: Refresh data in one of your Auto Insights Datasets. For more information, go to Plan View for Auto Insights Tasks.
Create Plan Branches
In some scenarios, you may need to branch plan execution steps based on the results of a task in the plan. For example, you may need to send separate messages using an HTTP task depending on whether a previous task succeeds or fails in execution. You can create branches in the plan graph by adding task execution rules and parallel nodes, which run based on the success and failure states of your plan runs.
To begin this simple example:
Create your first task.
Complete the following sections.
Define conditional execution
On the right side of the task that you have created, you can see the following icons. These icons indicate the pathways out of the task based on success, failure, or both. See the below image.
Tip
You can add new tasks to your plan and connect them to the first task at one of these pathways.
Icon | Description | |
|---|---|---|
| Tasks that are connected to this pathway are executed upon Success of the first task. | |
| Tasks that are connected to this pathway are executed upon Failure of the first task. | |
| Tasks that are connected to this pathway are executed upon any execution status of the first task. |


Example - Success or Failure Tasks in a Plan
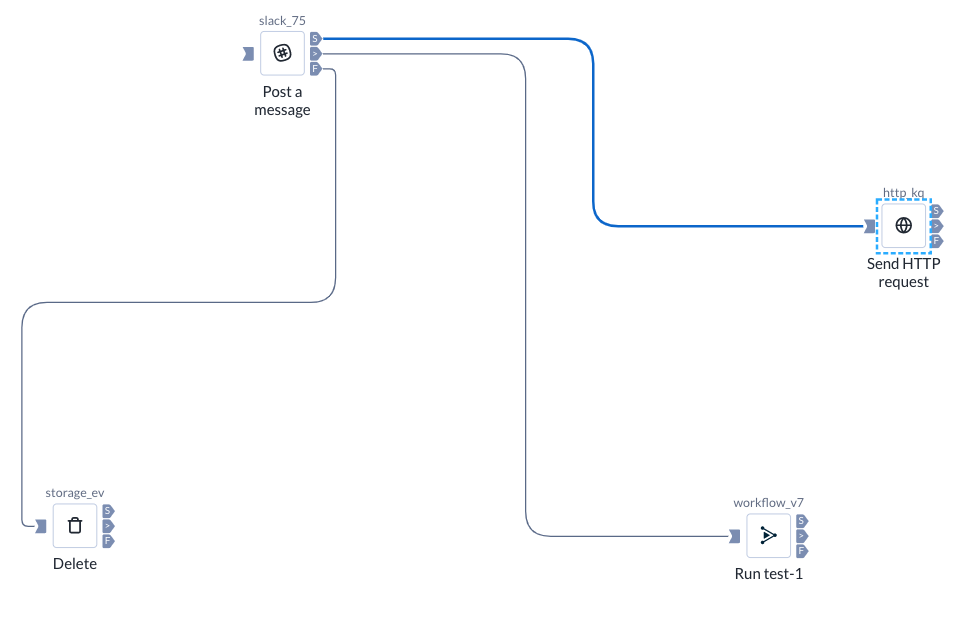
Figure: Conditional task execution of a plan
Apply Parameter Overrides
If your plan tasks include assets where parameters have been defined, you can review and override these parameter values. Overrides are applied when the task is triggered as part of a plan run.
Limited Parameterization Support
Plans only supports parameterization for Trifacta Classic Flows at this time.
From the Plan View context menu, select Parameters.
Review the names, sources, and current values for all of the parameters in your plan.
To apply an override, select the pencil icon and enter a new value. Select Save.
Subsequent runs of the plan use this new value as the override for the parameter.
Test Plan
After you have created the tasks of your plan, you can perform a test run of the plan.
To test, select Run.
The plan run is queued for execution.
Monitor Plan Runs
In the upper-right corner of Plan View, select the Runs link.
On the Plan Runs page, you can track the progress of your plan run.
The most recently triggered plan run is displayed.
If you have executed multiple runs, you can use the angle brackets next to the timestamp for the run.
For tasks in progress, you can select the task to display information in the context panel.
To see the details for the plan run, select the Outputs tab. Then select Job details.
For more information, go to Plan Runs Page.
Add Plan Schedule
You can add a schedule object to specify the triggers for the plan execution.
Note
A plan's schedule cannot be executed until its schedule has been enabled. If a plan has a schedule disabled, you can still execute it via the Run Now button.
Steps:
To begin, you can either select Schedule from the Plan View context menu, or select Create Schedule in the right context panel.
In the Add Trigger panel, you can specify the triggers when the plan is executed. You can specify one or more triggers:
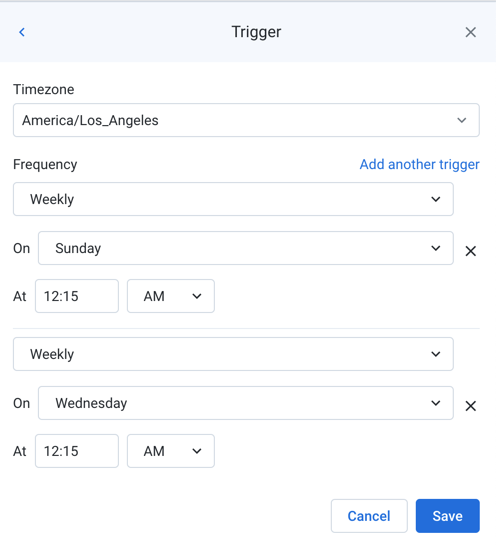
Figure: Add trigger(s)
For each trigger:
Timezone: Specify the timezone that applies to the scheduled time. For more information on timezones, go to Supported Time Zone Values.
Frequency: You can specify the frequency of when the schedule is triggered.
For each trigger, you can specify multiple On values (e.g. Same time on Sunday and Monday).
As needed, you can specify the On value using a modified form of cron job syntax. For more information, go to cron Schedule Syntax Reference.
To add more triggers, select Add another trigger and specify it.
To delete a trigger, select the X next to it.
Parameter overrides:
If the assets in your plan contain parameters, you can apply overrides to the parameter values.
Limited Parameterization Support
Plans only supports parameterization for Trifacta Classic Flows at this time.
Overrides provided in this panel are applied only when the trigger is executed.
Note
Multiple values are ok for plan parameters, as long as the parameter values do not conflict. If you see a warning icon next to a set of multiple parameter values, then you must fix this conflict in the original asset, or the plan fails to execute.
You can apply overrides through Plan View, too.
To save your schedule, select Save.
In the context panel, you can make changes to your schedule:
After saving, the schedule is automatically enabled. To disable the schedule, use the slider bar.
Note
A plan cannot be executed if the schedule for it has been disabled.
To make changes to the schedule and its triggers, select Edit.